Proxy by Traefik

For the past 30 or so years, if you wanted to proxy traffic to your web server, there were two, sometimes three, primary applications you reached for. Apache httpd, nginx, and HAProxy.

Apache httpd is one of the first web servers created, and is currently one of the most popular in use. While primarily used to serve web traffic, httpd can also be used to proxy traffic with the mod_proxy module. In addition to acting as a simple proxy, mod_proxy can also cache traffic, allowing for significant latency reduction for clients.

HAProxy is another option for proxying traffic. HAProxy tends to be deployed in load balancing scenarios and not single-server proxy situations. It is used by a number of high profile websites due to its speed and efficiency.

Finally, nginx is the third proxying solution. In addition to proxying, nginx can also serve many of the same roles as Apache httpd including local balancing, caching, and traditional web serving. Like haproxy, nginx is known for more efficient memory usage as compared to Apache httpd.

These solutions are battle hardened and have worked well for many years. But as technology changes, it often requires changes in the tools we use. With the advent of containerization, the tools we use should be re-examined and we should determine if we still have the best tools for the job.

Both nginx and haproxy were the primary choices used for proxying with containers. As the technology matured, however, new tools were created to take advantage of new features. One of those tools is Traefik.

Traefik is, according to their marketing, a “cloud native edge router.” If we tear apart the marketing speak, it’s basically a proxy built with containers in mind. It’s written in Go, and it has quite a few tricks up its sleeve.

You can use Traefik in the same general context as any of the other proxies, deploying it on a normal server and using a static configuration. Even deployed like this, the configuration is quite straightforward and very flexible.

But the real power of Traefik comes when it’s deployed in a container environment. Instead of using a static configuration, Traefik can listen to the docker daemon for specific labels applied to containers. Those labels contain the Traefik configuration for the container they’re applied to. It works similar to the static configuration, but it’s dynamic in nature, configuring Traefik as containers are started and stopped.

The community version of Traefik allows this by directly mounting the docker socket file, which is a bit of a security risk. If this container were to be compromised, an attacker could use the mounted socket to control other containers on the server. So this isn’t a secure way of deploying Traefik.

There are other ways to deploy, however, that make the system inherently more secure. Traefik has released an enterprise version, TraefikEE, that decouples the configuration management piece into its own container. This container also mounts the docker socket file, but has no external ports open, thereby isolating the container. The purpose of this new management container is to read changes in the labels and push the configuration to the primary Traefik container. It also scales, allowing additional Traefik nodes to be added which will receive the configuration from the management container.

Another way to deploy this securely is to use an external storage container for the traefik configuration. Consul is a popular option for this. Consul, amongst other things, is a key-value store. The configuration for Traefik can be stored here and dynamically updated as needed. Traefik will automatically re-read the configuration and adjust accordingly.

There are caveats with this method, however. First, you’ll need a way to get the configuration for the containers into Consul. Fortunately, there’s an open source project that may be able to do this already called registrator.

The registrator project works similar to how the management container works for TraefikEE, though in a more general way. It’s not specifically for Traefik, but intended to register containers with Consul. It’s an isolated container that listens for labels and adds the data to Consul. There are no open ports, reducing the likelihood that this particular container can be compromised and used to attack the rest of the system.

I haven’t tested using registrator in this way, however. (It doesn’t work, see the UPDATE below) I believe it would require modifying the registrator configuration to both register the containers as well as add arbitrary configuration information to Consul. This is something I’ll be investigating later as I learn more about how Consul works.

Another caveat to this approach is that there is no atomic update mechanism in Consul. What this means is that if Consul reads the configuration while it’s being updated by something like registrator, it’s will end up using an incomplete configuration until the next time it reads the configuration. There is a workaround for this in the documentation, but it requires additional programming to put into place.

Despite these few drawbacks, however, Traefik is an amazing tool for proxying in a container environment. And the Containous team is hard at work on version 2 which significantly cleans up and enhances the configuration possible with Traefik as well as adding the ability to add middleware functions that can be used to dynamically alter traffic as it passes through Traefik. Definitely worth checking out when it’s released.

UPDATE: I finally had a chance to do some research on registering services with Consul and inserting data in the to he KV store. Unfortunately, registrator can’t do this job. It only handles creating tags on a Consul entry and not KV entries.

I have been unsuccessful, thus far, in finding a solution for this particular use case. However, I believe that the registrator source code can be updated to allow for this.

SPOFs

This entry is part of the “Deployment Quest” series.

Multiple chains with a single link connecting them

SPOFs, or a Single Points of Failure, are the points in a system that can cause a complete failure of the overall system. These can be both technological and operational in nature. Creating a truly resilient system means identifying and mitigating as many of these as you can. Truly resilient systems minimize SPOFs and put mechanisms in place to handle any SPOFs that can’t be immediately dealt with and minimize the consequences of any given failure.

Single Point of Failure

A single point of failure is a part of a system that, if it fails, will stop the entire system from working. SPOFs are undesirable in any system with a goal of high availability or reliability, be it a business practice, software application, or other industrial system.

Wikipedia

If we look back at the first post in this series, there are a multitude of SPOFs that need to be handled. Our first deployment is a single server with a single network feed. The following is a list of immediate SPOFs that need to be dealt with:

  • Single network connection
  • Single network interface
  • Single server
  • Single database
  • Monolithic application
  • Single hard drive
  • Single power supply

All of these SPOFs are technological in nature. We didn’t explore the operational workflows around this deployment, so identifying non-technological is beyond this particular exercise.

In the second post, we discussed mitigation of some of these SPOFs. Primarily, we distributed services to multiple servers, mitigating the single server as a SPOF. However, the failure of any single service results in the failure of the whole.

Mitigating SPOFs comes down to identifying where you depend on a single resource and developing a strategy to mitigate it. In our previous example, we identified the server as a SPOF and mitigated it by using multiple servers. However, since we’re still dealing with single instances of dependent services, mitigating this SPOF doesn’t help us much.

If we duplicated each service and placed each on its own server, we’re in a much better situation. Failure of any single server, while potentially degrading overall service, will not result in the complete failure of the system. So, we need to identify SPOFs while keeping in mind any dependencies between components.

Now that we’ve deployed multiple copies of each service, what other SPOFs still exist? Each server only has a single power supply, there’s only one network interface on each server, and the overall system only has a single network feed. So we can continue mitigating SPOFs by duplicating each component. For instance, we can add multiple network interfaces to each server, deploy additional network connections, and ensure there are multiple power supplies in each server.

There is a point of diminishing returns, however. Given unlimited time and resources, every SPOF can be eliminated, but is that realistic? In a real world scenario, there are often constraints that cannot be easily overcome. For instance, it may not be possible to deploy multiple network connections in a given location. However, it may be possible to distribute services across multiple locations, thereby eliminating multiple SPOFs in one fell swoop.

By deploying to two or more locations, you potentially eliminate multiple SPOFs. Each location will have a network connection, separate power, and separate facilities. Mitigating each of these SPOFs increases the resiliency of the overall system.

In other situations, there may be financial constraints. Deploying to multiple locations may be cost prohibitive, so mitigations need to come in different forms. Adding additional network interfaces and connections help mitigate network failures. Multiple power supplies mitigate hardware failures. And deploying UPS power or, if possible, separate power sources, mitigates power problems.

Each deployment has its own challenges for resiliency and engineers need to work to identify and mitigate each one.

Thou Shalt Segment

This entry is part of the “Deployment Quest” series.

In the previous article, we discussed a very simple monolithic deployment. One server with all of the relevant services necessary to make our application work. We discussed details such as drive layout, package installation, and some basic security controls.

In this article, we’ll expand that design a bit by deploying individual services and explain, along the way, why we do this. This won’t solve the single point of failure issues that we discussed previously, but these changes will move us further down the path of a reliable and resilient deployment.

Let’s do a quick recap first. Our single server deployment includes a simple website application and a database. We can break this up into two, possibly three distinct applications to be deployed. The database is straightforward. Then we have the website itself which we can break into a proxy server for security and the primary web server where the application will exist.

Why a proxy server, you may ask. Well, our ultimate goals are security, reliability, and resiliency. Adding an additional service may sound counter-intuitive, but with a proxy server in front of everything we gain some additional security as well as a means to load balance when we eventually scale out the application for resiliency and reliability purposes.

The security comes by adding an additional layer between the client and the protected data. If the proxy server is compromised, the attacker still has to move through additional layers to get to the data. Additionally, proxy servers rarely contain any sensitive data on them. ie, there are no usernames or passwords located on the proxy server.

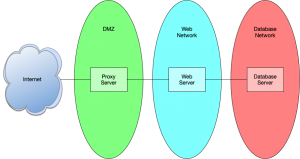
In addition to breaking this deployment into three services, we also want to isolate those services into purpose-built networks. The proxy server should live in what is commonly called a DMZ network, we can place the web server in a network designated for web servers, and the database goes into a database network.

Simple network diagram containing a DMZ, Web Network, and Database Network.
Segmented networks

Keeping these services separate allows you to add additional layers of protection such as firewall rules that limit access to each asset. For instance, the proxy server typically needs ports 80 and 443 open to allow http and https traffic. The web server requires whatever port the web application is running on to be open, and the database server only needs the database port open. Additionally, you can limit the source of the traffic as well. Proxy servers are typically open to the world, but the web server only needs to be open to the proxy server, and the database server only needs to be open to the web server.

With this new deployment strategy, we’ve increased the number of servers and added the need for a lot of new configuration which increases complexity a bit. However, this provides us with a number of benefits. For starters, we have more control over the security of each system, allowing us to reduce the attack surface of each individual server. We’ve also added the ability to place firewalls in between each server, limiting the traffic to specific ports and, in certain instances, from specific hosts.

Separating the services to their own servers also has the potential of allowing for horizontal scaling. For instance, you can run multiple proxy and web servers, allowing additional resiliency in case of the failure of one or more servers. Scaling the proxy servers requires some additional network wizardry or the presence of a load balancing device of some sort, but the capability is there. We’ll discuss horizontal scaling in a future post.

The downside of a deployment like this is the complexity and the additional overhead required. Instead of a single server to maintain, you now have three. You’ve also added firewalls to the mix which also need maintenance. There’s also additional latency added due to the network overhead of communication between the servers. This can be reduced through a number of techniques such as caching, but is generally not an issue for typical web applications.

The example we’ve used, thus far, is quite simplistic and this is not necessarily a good strategy for a small web application deployment, but provides an easy to understand example as we expand our deployment options. In future posts we’ll look at horizontal scaling, load balancing, and we’ll start digging into new technologies such as containerization.

Ye Olde Monolith-e

This entry is part of the “Deployment Quest” series.

Let’s get started by walking through deploying a single monolithic application to a single server. No fancy deployment tools, no containers, etc. For this exercise, we’ll stick to traditional basics.

We’re also going to make a few basic assumptions. First, you already have a server sufficiently powered to run this application and all of the necessary dependencies. Second, there is a network connection available allowing us to download relevant software as well as allow users to access the application once it’s up and running. We will cover a few network related topics, but we’ll be skipping over topics such as subnetting, routing, switching, etc.

Step one is to prepare the server itself. To start, we’re going to need an operating system. I’m a Linux guy, so we’ll be using Linux throughout this whole series. It’s possible to deploy applications on Windows, and there are a lot of people who do. I don’t trust Windows enough to run services on it, so I’ll happily stick to Linux.

There are a lot of different Linux distributions and we’re going to need to choose one. Taking a quick look at a top ten list, you’ll see some pretty well-known names such as Ubuntu, Redhat, CentOS, Suse, etc. I’m partial to Redhat and CentOS, so let’s use CentOS as our base.

Awesome. So we have an OS, which we’ll just install and get rolling. But wait, how are we going to configure the OS? Are we using the default drive layout? Are we going to customize it? What about the software packages that are installed? Do we just install everything so we have it in case we ever need it?

The answer to these questions depends, somewhat, on what you’re trying to accomplish. By default, most distributions seem to just dump all the space into the root drive, with a small carve out for swap. This provides a quick way to get going, but can lead to problems down the road. For instance, if a process spins out of control and writes a lot of data to the drive, it can fill up and result in degrading services, or worse, crashing. It also makes it harder to rebuild a server, if needed, as the entire drive needs to be reformatted versus specific mount points.

My recommendation here would be to split up the drive into reasonable chunks. Specifically, I tend to create mount points for /home and /var/log at a minimum. Depending on the role of the server, it may be wise to create mount points for /tmp and /var/tmp as well to ensure temporary files don’t cause issues. You’ll also likely need a mount point for the application you’re deploying. I tend to put software in /opt and, for web-based applications, /var/www. Ultimately, though, drive layouts tend to be personal choices.

Next up, packages. Most installers provide a minimal install and that would be my recommendation. Adding new packages is relatively easy while removing packages can often be a time consuming process. Sure, you can simply remove a single package, but ensuring that all unused dependencies are uninstalled as well is often a fools errand. The purpose here is to ensure that you have what you need to run the application without adding a lot of extra packages that take up space, at best, and provide attackers with tools they can use, at worst.

Take the time to go through all of the applications that run on startup. Are you sure you need to have cups running? What about portmap? Disable anything you’re not using, and go the extra mile to remove those packages from the system. You’ll also want to make a decision on security features such as SELinux. Yes, it’s complicated and can cause headaches, but the benefits are significant. I highly recommend running SELinux, or at least trying to deploy your application with it enabled first before deciding to remove it.

Finally, you need to configure the network connection on the server. The majority of this is left as an exercise to the reader, but I will highlight a few things. Security is important and you’ll want to protect your server and the assets on the server. To that end, I highly recommend looking into some sort of firewall. CentOS ships with iptables which can handle that task for you, but you can also use a network firewall. Additionally, look into properly segmenting your network. This makes more sense for multi-server deployments, however, and doesn’t necessarily apply for this specific example.

Spend the extra time to test that the network connection works. Doing this now before you get your application installed and running can save some headaches down the road. Can you ping from the server to the local network? How about to the Internet? Can you connect to the server from the local network? How about the Internet? If you cannot, then take the time to troubleshoot now. Check your IP, subnet, and firewall settings. Remember, ping uses ICMP while HTTP and SSH use TCP. It’s possible to allow one and not the other.

Now that we have a server with a working operating system and network, we should be ready to deploy our application. While different applications tend to be unique in how they’re deployed, there are a number of common tasks you should be looking at.

From an operational standpoint, ensure that the mount points your application is installed on have sufficient space for both the application and any temporary and permanent data that will be written. Some applications write log files and you’ll want to ensure those are put in a place where they can be handled appropriately. You’ll also want to make sure log rotation is handled so they don’t grow endlessly or become too large to manage.

On the security end of things, there are a number of items to look out for. Check the ownership of the files you’re deployed and ensure they’re owned by a user with only the privileges necessary to run the application. You’ll also want to check the SELinux labels to ensure they’re in the correct groups. Finally, check the user your application is running as. Again, you want this to be a user with the least privileges necessary to run the application.

The goal is to ensure that if an attacker is able to get access to the server, they end up with a user account that has insufficient privileges to do anything malicious. SELinux assists here in that the user will be prevented from accessing anything outside of the scope of the groups assigned.

And now, with all of this in place, test the application and debug accordingly. Congrats, you have a running application that you can build on in the future.

So, what have we accomplished here? And what are the pros/cons of deploying something like this?

We’ve deployed a simple application on a single server with some security in place to prevent attackers from gaining a foothold on the system. There’s a limit to how secure we can make this, though, since it’s a single server.

On the positive side, this is a very simplistic setup. A single server to manage, only one ingress and egress point, and we’ve minimized the packages installed on the system. On the other hand, if an attacker can gain a foothold, they’ll have access to everything. A single server is also a single point of failure, so if something goes wrong, your application will be down until it’s fixed.

A setup like this is good for development and can be a good starting point for hobbyist admins. There are more secure and resilient ways to deploy applications that we’ll cover in a future Deployment Quest entry.

Deployment Quest

So you want to deploy an application… You’ve put in the time and developed the latest and greatest widget and now you want to expose it to the world. It’s something truly ground breaking and people will be rushing to check it out. But where do you start? What’s involved with deploying an application, anyway?

The answer, it turns out, varies quite a bit, depending on what you’re trying to accomplish. So where to begin? First you need to determine what architecture you want to use. Are you deploying a simple website that can be stood up on a LAMP stack? Or perhaps this is something a bit more involved that requires additional back end services.

Are you deploying to a cloud provider such as AWS, Azure, or GCP? Will this be deployed on a virtual machine, or are you using something “newer” such as containers or serverless?

Do you have data to be stored? If so, how are you planning on storing this data? Are you using a SQL or NoSQL database? Do you need to store files?

How much traffic are you expecting? Do you need to be able to scale to larger workloads? Will you scale vertically or horizontally? Do you have or need a caching layer?

What about security? How will you protect the application? What about the data the application stores? How “secure” do you need to make your application and it’s deployment?

As you can see, there are a lot of questions to answer, despite this being a relatively simple application. Over the next few blog posts I’ll be digging into various deployment strategies, specifics on various choices you can make, and the pros and cons of each. Links to each post can be found below:

A Strange Game.

WOPR Summit Logo

On March 1st, 2019, an eclectic group of diverse individuals descended upon Bally’s Hotel in Atlantic City, NJ. Their purpose? Attending a new conference melding hardware, software, and security. A conference called WOPR Summit.

WOPR Registration

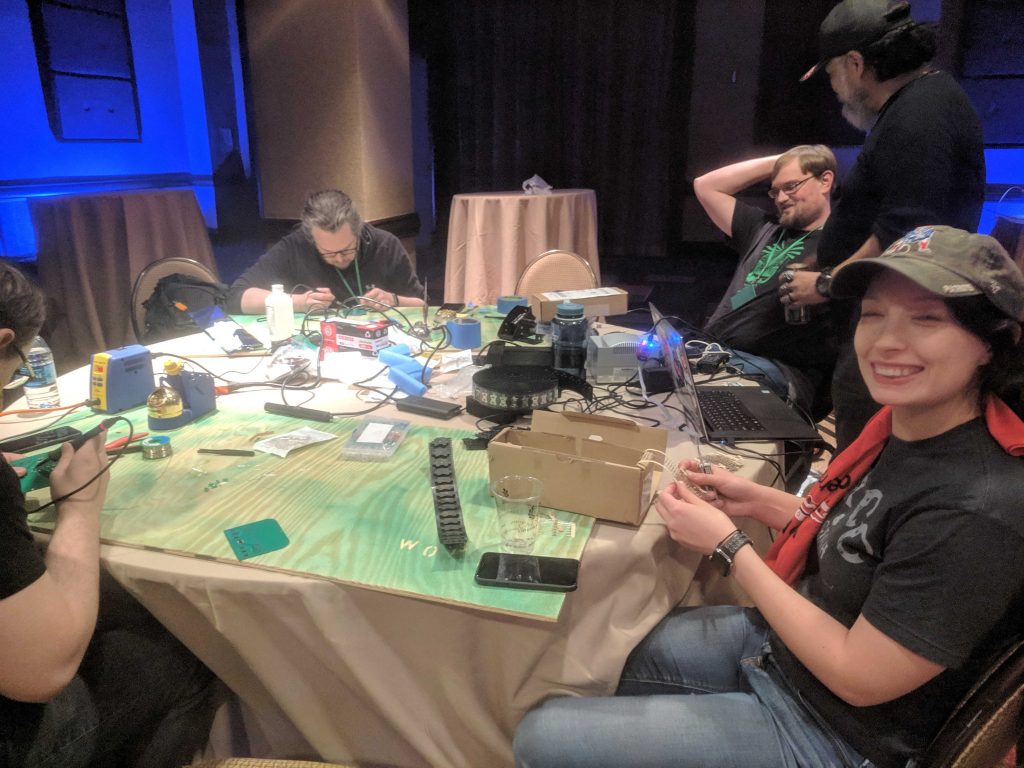
I had the good fortune to both attend and volunteer at this fledgling conference. Upon arriving at the registration desk, attendees were greeted by yours truly who provided them with lanyards, stickers, and a badge that doubles as a maker project.


WOPR Badge

BEHOLD. The WOPR Badge.

The badge is both an attendees pass into the event as well as a PCB. Throughout the conference, attendees could hang out in the maker space and were provided with all of the parts, tools, and directions necessary to build their badge. When completed, a quick visit to Dragorn or Dr Russ was necessary to flash the badge processor with some Arduino code that made the lights blink in an awfully suspicious sequence. Almost as if there were a hidden message. Hrm…

Completed WOPR Badge

And for those unfamiliar with the black art of soldering, fear not! BiaSciLab to the rescue! Our resident soldering instructor, Bia, held several soldering workshops throughout the conference, providing detailed instruction on how to become a master at fusing small metal bits together with a strong bond of liquid metal. Bia is an amazing teacher and was able to help a lot of people learn this essential life skill. She even brought her own soldering kits that you can read about here.

Not into making things? Not to worry, we had that covered as well. Throughout the conference there were both talks and workshops on a variety of topics. Workshops included topics such as NFC hacking, monitoring and incident response using OSQuery, developing prototypes, and reverse engineering. Talks covered similar topics including presentations on Shodan, biohacking with c00p3r, and a peek behind the scenes of the security industry.

Overall, the conference was an amazing success and quite well run for a first-time con. There are a lot of lessons learned and many suggestions on how to improve it for next year. Planning has already begun and we hope to see you there!

Does it do the thing?

Back in 2012 I gave a talk at Derbycon 2.0. This was my first infosec talk and I was a little nervous, to say the least. Anyway, I described a system I wanted to write that handled distributed baseline scanning.

After a lot of starts and stops, I finished a basic 1.0 version in 2014. It’s still quite rough and I’ve since been working, intermittently, on making the system more robust and solid. I’ve been working on a python replacement for the GUI as well, instead of the current PHP one. The repository is located here, if you’re interested in taking a look.

Why am I telling you all of this? Well, as part of the updates I’m making, I wanted to do things the “right way” and make sure I have unit testing in place before I start making additional changes to the code. Problem is, while I learned about unit testing, I’ve never really implemented it in any meaningful way, so this is a bit new to me.

So why unit testing? Well, the hypothesis is that by creating tests that check every line of code, you ensure that the code is working as expected. Thus, if the tests pass, then the code should be solid and bug free. In reality, this is rarely the case. Tests can be just as flawed as any other code. Additionally, you may miss testing certain corner cases and miss potential bugs. In the end, the general consensus is that unit testing is a complicated religious argument.

Let’s assume that we want to unit test anyway and move on to the actual testing bits, shall we? We’ll start with a contrived example to make things easier. Assume we have the following code in a file called mytestcode.py:

#!/bin/python

def add(value1, value2):
    return value1 + value2

Simple enough, just a simple function to return the value of two numbers added together. Let’s create some test cases, shall we?

#!/bin/python

from mytestcode import add

class TestAdd(object):
    def test_add(self):
        assert add(1,1) == 2

    def test_add_fail(self):
        assert add(1,1) != 3

What we have here are two simple test cases. First, we test to make sure that if we call the add function with two values, 1 and 1, we get a 2 as a return value. Second, we test that providing the same values as input does not return a 3. Simple, right? But have we really tested all of the corner cases? What happens if we feed the function a negative? How about a non-numeric value? Are there cases where we can cause an exception?

To be fair, the original function is poorly written and is merely being used as a simple example. This is the problem with contrived examples, of course. They miss important details, often simply things too much, and can lead to beginners making big mistakes when using them as teaching tools. So please, be aware, the above code really isn’t very good code. It’s intended to be simple to understand.

Let’s take a look at some “real” code directly from my distributed scanner project. This particular code is something I found on Stack Overflow when I was looking for a way to identify whether a process was still running or not.

#!/usr/bin/python

import errno
import os
import sys

def pid_exists(pid):
    """Check whether pid exists in the current process table.
    UNIX only.
    """
    if pid < 0:
        return False
    if pid == 0:
        # According to "man 2 kill" PID 0 refers to every process
        # in the process group of the calling process.
        # On certain systems 0 is a valid PID but we have no way
        # to know that in a portable fashion.
        raise ValueError('invalid PID 0')
    try:
        os.kill(pid, 0)
    except OSError as err:
        if err.errno == errno.ESRCH:
            # ESRCH == No such process
            return False
        elif err.errno == errno.EPERM:
            # EPERM clearly means there's a process to deny access to
            return True
        else:
            # According to "man 2 kill" possible error values are
            # (EINVAL, EPERM, ESRCH)
            raise
    else:
        return True

Testing this code should be relatively straightforward, with the exception of the os.kill call. For that, we’ll need to delve into mock objects. Let’s tackle the simple cases first:

#!/usr/bin/env python

import pytest

from libs.funcs import pid_exists

class TestFuncs(object):
    def test_pid_negative(self):
        assert pid_exists(-1) == False

    def test_pid_zero(self):
        with pytest.raises(ValueError) as e_info:
            pid_exists(0)

    def test_pid_typeerror(self):
        with pytest.raises(TypeError):
            pid_exists('foo')
        with pytest.raises(TypeError):
            pid_exists(5.0)
        with pytest.raises(TypeError):
            pid_exists(1234.4321)

That’s relatively simple. We verify that False is returned for a negative PID and a ValueError is returned for a PID of zero. We also test that a TypeError is returned if we don’t provide an integer value. What’s left is handling a valid PID and testing that it returns True for a running process and False otherwise. In order to test the rest, we could go through a lot of elaborate setup to start a process, get the PID, and then test our code, but there’s a lot that can go wrong there. Additionally, we’re looking to test our logic and not the entirety of another module. So, what we really want is a way to provide an arbitrary return value for a given call. Enter the mock module.

The mock module is part of the unittest framework in python. Essentially, the mock module allows you to identify a call or an object that you want to create a fake version of, and then provide the behavior you’re expecting that mocked version to have. So, for instance, you can mock a function call and simply provide the return value you’re looking for instead of having to call the function directly. This functionality allows you to precisely test your logic versus doing a deeper integration test.

To finish up our testing code for the pid_exists() function, we want to mock the os.kill() function and have it return specific values so we can check the various branches of code we have.

    @patch('os.kill')
    def test_pid_exists(self, oskillobj):
        oskillobj.return_value = None
        assert pid_exists(100) == True

    @patch('os.kill')
    def test_pid_does_not_exist(self, oskillobj):
        oskillobj.side_effect = OSError(errno.ESRCH, 'No such process')
        assert pid_exists(1234) == False

    @patch('os.kill')
    def test_pid_no_permissions(self, oskillobj):
        oskillobj.side_effect = OSError(errno.EPERM, 'Operation not permitted')
        assert pid_exists(1234) == True

    @patch('os.kill')
    def test_pid_invalid(self, oskillobj):
        oskillobj.side_effect = OSError(errno.EINVAL, 'Invalid argument')
        with pytest.raises(OSError):
            pid_exists(2468)

    @patch('os.kill')
    def test_pid_os_typeerror(self, oskillobj):
        oskillobj.side_effect = TypeError('an integer is required (got type str)')
        with pytest.raises(TypeError):
            pid_exists(1234)

The above code tests all of the branching available in the rest of the code, verifying the logic we’ve written. The code should be pretty straightforward. The return_value attribute of a mock object directly defines what we want the mocked function to recall while the side_effect attribute allows us to throw an exception in response to the function call. With those two features of a mocked object, we’re able to successfully test the rest of the cases we need.

This little journey to learn how to write unit tests has been fun and informative. I just need to finish up the rest of the code, striving to hit as close to 100% coverage as I can while keeping the test cases reasonable. It’s taken a while to get going, but the more code I’ve been writing, the faster and more accurate I’m getting. As they say, “practice makes perfect,” though I’d settle with functionally complete and relatively bug-free.

One final word of caution. I’m a sole developer working on this code, so I’m the only one around to write test cases. In a larger shop, the originator of the logic should not be the one writing the test cases. The reason for this is that the original coder typically knows their code quite well and has expectations regarding how the code will be used. For instance, I’m expecting that anyone calling the add() function I wrote above to only supply numbers and I haven’t added any sort of type checking or input validation. As a result, I avoided adding test cases that supply invalid inputs, knowing that would fail. Someone else writing the test cases would likely have provided a number of different inputs and found that input validation was missing. So if you’re in a larger shop, do yourself a favor and have someone else write your test cases. And to ensure they provide robust test cases, only provide the function prototypes and not the full function definitions.

It’s docker, it’s a container, it’s… a process?

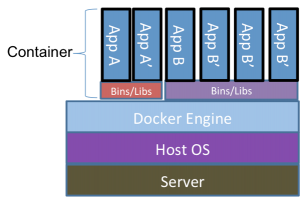
In a previous post I discussed Docker from a high level. In this post, we’ll take a closer look at how processes run in a container and how it differs from the common view of the architecture that is used to explain Docker. Remember this?

Docker Layers

The problem with this image, however, is that while it helps conceptualize what we’re talking about, it doesn’t reflect reality. If you listed the processes outside of the container, one might think you’d see the docker daemon running and a bunch of additional processes that represent the containers themselves:

[root@dockerhost ~]# ps -ef
UID        PID  PPID  C STIME TTY          TIME CMD
root         1     0  0 Oct15 ?        00:02:40 /usr/lib/systemd/systemd --switched-root --system --deserialize 21
root         2     0  0 Oct15 ?        00:00:03 [kthreadd]
root         3     2  0 Oct15 ?        00:03:44 [ksoftirqd/0]
...
root      4000     1  0 Oct15 ?        00:03:44 dockerd
root      4353  4000  0 Oct15 ?        00:03:44 myawesomecontainer1
root      4354  4000  0 Oct15 ?        00:03:44 myawesomecontainer2
root      4355  4000  0 Oct15 ?        00:03:44 myawesomecontainer3

And while this might be what you’d expect based on the image above, it does not represent reality. What you’ll actually see is the docker daemon running with a number of additional helper daemons to handle things like networking, and the processes that are running “inside” of the containers like this:

[root@dockerhost ~]# ps -ef
UID        PID  PPID  C STIME TTY          TIME CMD
root         1     0  0 Oct15 ?        00:02:40 /usr/lib/systemd/systemd --switched-root --system --deserialize 21
root         2     0  0 Oct15 ?        00:00:03 [kthreadd]
root         3     2  0 Oct15 ?        00:03:44 [ksoftirqd/0]
...
root      1514     1  0 Oct15 ?        04:28:40 /usr/bin/dockerd-current --add-runtime docker-runc=/usr/libexec/docker/docker-runc-current --default-runtime=docker-runc --exec-opt nat
root      1673  1514  0 Oct15 ?        01:27:08 /usr/bin/docker-containerd-current -l unix:///var/run/docker/libcontainerd/docker-containerd.sock --metrics-interval=0 --start-timeout
root      4035  1673  0 Oct31 ?        00:00:07 /usr/bin/docker-containerd-shim-current d548c5b83fa61d8e3bd86ad42a7ffea9b7c86e3f9d8095c1577d3e1270bb9420 /var/run/docker/libcontainerd/
root      4054  4035  0 Oct31 ?        00:01:24 apache2 -DFOREGROUND
33        6281  4054  0 Nov13 ?        00:00:07 apache2 -DFOREGROUND
33        8526  4054  0 Nov16 ?        00:00:03 apache2 -DFOREGROUND
33       24333  4054  0 04:13 ?        00:00:00 apache2 -DFOREGROUND
root     28489  1514  0 Oct31 ?        00:00:01 /usr/libexec/docker/docker-proxy-current -proto tcp -host-ip 0.0.0.0 -host-port 443 -container-ip 172.22.0.3 -container-port 443
root     28502  1514  0 Oct31 ?        00:00:01 /usr/libexec/docker/docker-proxy-current -proto tcp -host-ip 0.0.0.0 -host-port 80 -container-ip 172.22.0.3 -container-port 80
33       19216  4054  0 Nov13 ?        00:00:08 apache2 -DFOREGROUND

Without diving too deep into this, the docker processes you see above serve a few processes. There’s the main dockerd process which is responsible for management of docker containers on this host. The containerd processes handle all of the lower level management tasks for the containers themselves. And finally, the docker-proxy processes are responsible for the networking layer between the docker daemon and the host.

You’ll also see a number of apache2 processes mixed in here as well. Those are the processes running within the container, and they look just like regular processes running on a linux system. The key difference is that a number of kernel features are being used to isolate these processes so they are isolated away from the rest of the system. On the docker host you can see them, but when viewing the world from the context of a container, you cannot.

What is this black magic, you ask? Well, it’s primarily two kernel features called Namespaces and cgroups. Let’s take a look at how these work.

Namespaces are essentially internal mapping mechanisms that allow processes to have their own collections of partitioned resources. So, for instance, a process can have a pid namespace allowing that process to start a number of additional processed that can only see each other and not anything outside of the main process that owns the pid namespace. So let’s take a look at our earlier process list example. Inside of a given container you may see this:

[root@dockercontainer ~]# ps -ef
UID        PID  PPID  C STIME TTY          TIME CMD
root         1     0  0 Nov27 ?        00:00:12 apache2 -DFOREGROUND
www-data    18     1  0 Nov27 ?        00:00:56 apache2 -DFOREGROUND
www-data    20     1  0 Nov27 ?        00:00:24 apache2 -DFOREGROUND
www-data    21     1  0 Nov27 ?        00:00:22 apache2 -DFOREGROUND
root       559     0  0 14:30 ?        00:00:00 ps -ef

While outside of the container, you’ll see this:

[root@dockerhost ~]# ps -ef
UID        PID  PPID  C STIME TTY          TIME CMD
root         1     0  0 Oct15 ?        00:02:40 /usr/lib/systemd/systemd --switched-root --system --deserialize 21
root         2     0  0 Oct15 ?        00:00:03 [kthreadd]
root         3     2  0 Oct15 ?        00:03:44 [ksoftirqd/0]
...
root      1514     1  0 Oct15 ?        04:28:40 /usr/bin/dockerd-current --add-runtime docker-runc=/usr/libexec/docker/docker-runc-current --default-runtime=docker-runc --exec-opt nat
root      1673  1514  0 Oct15 ?        01:27:08 /usr/bin/docker-containerd-current -l unix:///var/run/docker/libcontainerd/docker-containerd.sock --metrics-interval=0 --start-timeout
root      4035  1673  0 Oct31 ?        00:00:07 /usr/bin/docker-containerd-shim-current d548c5b83fa61d8e3bd86ad42a7ffea9b7c86e3f9d8095c1577d3e1270bb9420 /var/run/docker/libcontainerd/
root      4054  4035  0 Oct31 ?        00:01:24 apache2 -DFOREGROUND
33        6281  4054  0 Nov13 ?        00:00:07 apache2 -DFOREGROUND
33        8526  4054  0 Nov16 ?        00:00:03 apache2 -DFOREGROUND
33       24333  4054  0 04:13 ?        00:00:00 apache2 -DFOREGROUND
root     28489  1514  0 Oct31 ?        00:00:01 /usr/libexec/docker/docker-proxy-current -proto tcp -host-ip 0.0.0.0 -host-port 443 -container-ip 172.22.0.3 -container-port 443
root     28502  1514  0 Oct31 ?        00:00:01 /usr/libexec/docker/docker-proxy-current -proto tcp -host-ip 0.0.0.0 -host-port 80 -container-ip 172.22.0.3 -container-port 8033       19216  4054  0 Nov13 ?        00:00:08 apache2 -DFOREGROUND

There are two things to note here. First, within the container, you’re only seeing the processes that the container runs. No systems, no docker daemons, etc. Only the apache2 and ps processes. From outside of the container, however, you see all of the processes running on the system, including those within the container. And, the PIDs listed inside if the container are different from those outside of the container. In this example, PID 4054 outside of the container would appear to map to PID 1 inside of the container. This provides a layer of security such that running a process inside of a container can only interact with other processes running in the container. And if you kill process 1 inside of a container, the entire container comes to a screeching halt, much as if you kill process 1 on a linux host.

PID namespaces are only one of the namespaces that Docker makes use of. There are also NET, IPC, MNT, UTS, and User namespaces, though User namespaces are disabled by default. Briefly, these namespaces provide the following:

  • NET
    • Isolates a network stack for use within the container. Network stacks can, and typically are, shared between containers.
  • IPC
    • Provides isolated Inter-Process Communications within a container, allowing a container to use features such as shared memory while keeping the communication isolated within the container.
  • MNT
    • Allows mount points to be isolated, preventing new mount points from being added to the host system.
  • UTS
    • Allows different host and domains names to be presented to containers
  • User
    • Allows a mapping of users and groups with container to the host system, thereby preventing a root user within a container from running as pid 1 outside of the container.

The second piece of black magic used is Control Groups or cgroups. Cgroups isolates resource usage for a process. Where Namespaces creates a localized view of resources for a process, cgroups creates a limited pool of resources for a process. For instance, you can assign specific CPU, Memory, and Disk I/O limits to a container. With a cgroup is assigned, the process cannot exceed the limits put on it, thereby preventing processes from “running away” and exhausting system resources. Instead, the process either deals with the lower resource limits, or crashes.

By themselves, these features can be a bit daunting to set up for each process or group of processes. Docker conveniently packages this up, making deployment as simple as a docker run command. Combined with the packaging of a Docker container (which I’ll cover in a future post), Docker becomes a great way to deploy software in a reproducible, secure manner.

The obligatory Docker 101 post

Welcome to the obligatory Docker 101 post. Before I dive into more technical posts on this subject, I thought it would be worth the time to explain what docker is and what I find exciting about it. If you’re familiar with Docker already, there likely won’t be anything new here for you, but I welcome any feedback you have.

So, what is Docker? Docker is a containerization technology first release as open source in 2013. But what is containerization? Containerization, or Operating System Level Virtualization, refers to the isolation, using kernel-level features, of a set of processes in which the processes only see a localized view of the system. This differs from Platform Virtualization in that Containerization is not presenting a set of virtual resources to the isolated processes, but is presenting real resources limited only by the configuration of that particular container.

One of the more common explanations of this architecture is shown in the following image:

Docker Layers

This image is a bit problematic in that it doesn’t truly represent what you actually see on a docker host, but we’ll save that for a later blog post. For now, trust that the above is a very simplified view of the docker world.

So why containerization and why Docker in particular? There are a number of benefits that containerization technology provides. Among these are immutability, portability, and security. Let’s touch briefly on each of these.

Immutability refers to the concept of something being unchangeable. In the case of containerization, a container is considered to be immutable. That is, once created, the container itself will remain unchanged for the duration of its life. But, it’s important to understand what this means in practice. The container image itself is immutable, but once running, the contents of the container can be changed within the parameters of its execution. The immutable piece of this comes into play when you destroy a running container and recreate it from the container image. That recreated image will have the exact same characteristics as the original container, assuming the same configuration is used to start the container. A notable exception to this is external volumes. Any volume external to the container is not guaranteed to be immutable as it’s not part of the original container image.

Portability refers to the ability to move containers between disparate systems and the container will run exactly the same, assuming no external dependencies. There are limitations to this such as requiring the same cpu architecture across the systems, but overall, a container can be moved from system to system and be expected to behave the same. In fact, this is part of the basis of orchestration and scalability of containers. In the event of a failure, or if additional instances of a container are necessary, they can be spun up on additional systems. And provided any external dependencies are available to all of the systems that the container is spun up on, the containers will run and behave the same.

Containers provide an additional layer of security over traditional virtual or physical hosts. Because the processes are isolated within the container, an attacker is left with a very limited attack surface. In the event of a compromise, the attacker only gets a foothold on that instance of the container and is generally left with very little tooling inside of the container with which to pivot to additional resources. If an attacker is able to make changes to the running container, the admin can simply destroy the container and spin up a new one which will no longer have the compromised changes. Obviously the admin needs to identify how the attacker got in and patch the container, but this ability to destroy and recreate a container is a powerful way to stop attackers from pivoting through your systems.

Finally, the internal networking of the docker system allows containers to run with no externally accessible ports. So, for instance, if you’re running some sort of dynamic site that requires a proxy, application, and database, the system can be set up such that the proxy is the only externally accessible container. All communication between the proxy, application, and database can be performed over the internal docker networking which has no externally accessible endpoint.

There’s a lot to be excited about here. Done correctly, the days of endlessly troubleshooting issues caused by server cruft are over. Deployment of resources because incredibly straightforward and rapid. Rollbacks become vastly simplified as you can just spin up the old version of the container. Containers provide developers a means to run their code locally, exactly as it will be run in production!

I’ve been working with containers for about 3 years now and the landscape just keeps expanding. There’s so much to learn and so many new tools to play with.

Finally, I’m going to leave you with a talk by Alice Goldfuss. Alice is an engineer that currently works for Github. She has a ton of container experience and a lot to say about it. Definitely worth a watch.

So, new digs?

It looks a bit different around here lately. Sure, it’s roughly the same as what it was, but something is off.. A little bit here and there, so what changed?

Well, to tell the truth, I’ve switched blogging platforms. Don’t get me wrong, I love Serendipity. I’ve used it for years, love the features, love the simplicity. Unfortunately, Serendipity doesn’t have the greatest support for offline blogging, updates are relatively sparse, and it’s limited to just blogging. So I decided it’s time for a change.

Ok. Deep breath. I’ve switched to WordPress. Yes, yes, I know. I’ve decried WordPress as an insecure platform for a long time, but I’ve somewhat changed my thinking. The team at WordPress has done a great job ensuring the core platform is secure and they’re actively working to help older installations upgrade to newer releases. Plugins are where the majority of the security issues exist these days, and many of the more popular plugins are being actively scanned for security issues. So, overall, the platform has moved forward with respect to security and is more than viable.

I’ve also been leveraging Docker in recent years. We’ll definitely be talking about Docker in the coming days/weeks, so I won’t go into it here. Suffice it to say, Docker helps enhance the overall security of the system while simultaneously making it a breeze to deploy new software and keep it up to date.

So, enjoy the new digs, and hopefully more changes will be coming in the near future. WordPress is capable of doing more than just blogging and I’m planning on exploring some of those capabilities a bit more. This is very much a continuing transition, so if you see something that’s off, please leave a comment and I’ll take a look.