Journey of a DevOps Engineer

“The advantage of a bad memory is that one enjoys several times the same good things for the first time.”

Friedrich Nietzsche

This post first appeared on Redhat’s Enable Sysadmin community. You can find the post here.

Memory is a funny construct. What we remember is often not what happened, or even the order it happened in. One of the earliest memories I have about technology was a trip my father and I took. We drove to Manhattan, on a mission to buy a Christmas gift for my mother. This crazy new device, The Itty Bitty Book Light, had come out recently and, being an avid reader, my mother had to have one.

We drove to Manhattan, on a mission to buy a Christmas gift for my mother. This crazy new device, The Itty Bitty Book Light, had come out recently and, being an avid reader, my mother had to have one.

After navigating the streets of Manhattan and finding a parking spot, we walked down the block to what turned out to be a large bookstore. You’ve seen bookstores like this on TV and in the movies. It looks small from the outside, but once you walk in, the store is endless. Walls of books, sliding ladders, tables with books piled high. It was pretty incredible, especially for someone like me who loves reading.

But in this particular store, there was something curious going on. One of the tables was surrounded by adults, awed and whispering between one another. Unsure of what was going on, we approached. After pushing through the crowd, what I saw drew me in immediately. On the table, surrounded by books, was a small grey box, the Apple Macintosh. It was on, but no one dared approach it. No one, that is, except me. I was drawn like a magnet, immediately grokking that the small puck like device moved the pointer on the screen. Adults gasped and murmured, but I ignored them all and delved into the unknown. The year was, I believe, 1984.

Somewhere around the same time, though likely a couple years before, my father brought home a TI-99/4A computer. From what I remember, the TI had just been released, so this has to be somewhere around 1982. This machine served as the catalyst for my love of computer technology and was one of the first machines I ever cut code on.

My father tells a story about when I first started programming. He had been working on an inventory database, written from scratch, that he built for his job. I would spend hours looking over his shoulder, absorbing everything I saw. One time, he finished coding, saved the code, and started typing the command to run his code (“RUN”). Accordingly to him, I stopped him with a comment that his code was going to fail. Ignoring me as I was only 5 or 6 at the time (according to his recollection), he ran the code and, as predicted, it failed. He looked at me with awe and I merely looked back and replied “GOSUB but no RETURN”.

At this point I was off and running. Over the years I got my hands on a few other systems including the Timex Sinclair, Commodore 64 and 128, TRS-80, IBM PS/2, and finally, my very own custom built PC from Gateway 2000. Since them I’ve built hundreds of machines and spend most of my time on laptops now.

The Commodore 64 helped introduce me to the online world of Bulletin Board Systems. I spent many hours, much to the chagrin of my father and the phone bill, calling into various BBS systems in many different states. Initially I was just there to play the various door games that were available, but eventually discovered the troves of software available to download. Trading software become a big draw until I eventually stumbled upon the Usenet groups that some boards had available. I spent a lot of time reading, replying, and even ended up in more than one flame war.

My first introduction to Unix based operating systems was in college when I encountered an IBM AIX mainframe as well as a VAX. I also had access to a shell account at the local telephone company turned internet service provider. The ISP I was using helpfully sent out an email to all subscribers about the S.A.T.A.N. toolkit and how accounts found with the software in their home directories would be immediately banned. Being curious, I immediately responded looking for more information. And while my account was never banned, I did learn a lot.

At the same time, my father and I started our own BBS which grew into a local Internet Service Provider offering dial-up services. That company still exists today, though the dial-up service died off several years ago. This introduced me to networks and all the engineering that comes along with it.

From here my journey takes a bit of a turn. Since I was a kid, I’ve wanted to build video games. I’ve read a lot of books on the subject, talked to various developers (including my idol, John Carmack) and written a lot of code. I actually wrote a pacman clone, of sorts, on the Commodore 64 when I was younger. But, alas, I think I was born on the wrong coast. All of the game companies, at the time, were located on the west coast and I couldn’t find a way to get there. So, I redirected my efforts a bit and focused on the technology I could get my hands on.

Running a BBS, and later an ISP, was a great introduction into the world of networking. After working a few standard school-age jobs (fast food, restaurants, etc), I finally found a job doing tech support for an ISP. I paid attention, asked questions, and learned everything I could. I took initiative where I could, even writing a cli-based ticketing system with an mSQL database backing it.

This initiative paid of as I was moved later to the NOC and finally to Network Engineering. I lead the way, learning everything I could about ATM and helping to design and build the standard ATM-based node design used by the company for over a decade. I took over development of the in-house monitoring system, eventually rewriting it in KSH and, later, Perl. I also had a hand in development of a more modern ticketing system written in Perl that is still in use today.

I spent 20+ years as a network engineer, taking time along the way to ensure that we had Linux systems available for the various scripting and monitoring needed to ensure the network performed as it should. I’ve spent many hours writing code in shell, expect, perl, and other languages to automate updates and monitoring. Eventually, I found myself looking for a new role and a host of skills ranging from network and systems administration to coding and security.

About this time, DevOps was quickly becoming the next new thing. Initially I rejected the idea, solely responding to the “Development” and “Operations” tags that make up the name. Over time, however, I came to realize that DevOps is yet another fancy name for what I’ve been doing for decades, albeit with a few twists here and there. And so, I took a role as a DevOps Engineer.

DevOps is a fun discipline, mixing in technologies from across the spectrum in an effort to automate away everything you can. Let the machine do the work for you and spent your time on more interesting projects like building more automation. And with the advent of containers and orchestration, there’s more to do than ever.

These days I find myself leading a team of DevOps engineers, both guiding the path we take as we implement new technology and automate existing processes. I also spend a lot of time learning about new technologies both on my own and for my day job. My trajectory seems to be changing slightly as I head towards the world of the SRE. Sort of like DevOps, but a bit heavier on the development side of things.

Life throws curves and sometimes you’re not able to move in the direction you want. But if you keep at it, there’s something out there for everyone. I still love learning and playing with technology. And who knows, maybe I’ll end up writing games at some point. There’s plenty of time for another new hobby.

Ping, traceroute, and netstat are the trifecta network troubleshooting tools for a reason

This post first appeared on Redhat’s Enable Sysadmin community. You can find the post here.

I’ve spent a career building networks and servers, deploying, troubleshooting, and caring for applications. When there’s a network problem, be it outages or failed deployments, or you’re just plain curious about how things work, three simple tools come to mind: ping, traceroute, and netstat.

Ping

Ping is quite possibly one of the most well known tools available. Simply put, ping sends an “are you there?” message to a remote host. If the host is, in fact, there, it returns a “yup, I’m here” message. It does this using a protocol known as ICMP, or Internet Control Message Protocol. ICMP was designed to be an error reporting protocol and has a wide variety of uses that we won’t go into here.

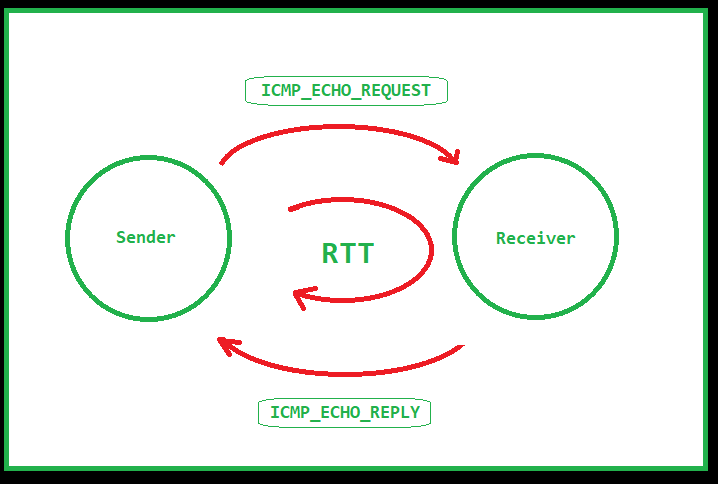
Ping uses two message types of ICMP, type 8 or Echo Request and type 0 or Echo Reply. When you issue a ping command, the source sends an ICMP Echo Request to the destination. If the destination is available, and allowed to respond, then it replies with an ICMP Echo Reply. Once the message returns to the source, the ping command displays a success message as well as the RTT or Round Trip Time. RTT can be an indicator of the latency between the source and destination.

Note: ICMP is typically a low priority protocol meaning that the RTT is not guaranteed to match what the RTT is to a higher priority protocol such as TCP.

Ping diagram (via GeeksforGeeks)

When the ping command completes, it displays a summary of the ping session. This summary tells you how many packets were sent and received, how much packet loss there was, and statistics on the RTT of the traffic. Ping is an excellent first step to identifying whether or not a destination is “alive” or not. Keep in mind, however, that some networks block ICMP traffic, so a failure to respond is not a guarantee that the destination is offline.

 $ ping google.com
PING google.com (172.217.10.46): 56 data bytes
64 bytes from 172.217.10.46: icmp_seq=0 ttl=56 time=15.740 ms
64 bytes from 172.217.10.46: icmp_seq=1 ttl=56 time=14.648 ms
64 bytes from 172.217.10.46: icmp_seq=2 ttl=56 time=11.153 ms
64 bytes from 172.217.10.46: icmp_seq=3 ttl=56 time=12.577 ms
64 bytes from 172.217.10.46: icmp_seq=4 ttl=56 time=22.400 ms
64 bytes from 172.217.10.46: icmp_seq=5 ttl=56 time=12.620 ms
^C
--- google.com ping statistics ---
6 packets transmitted, 6 packets received, 0.0% packet loss
round-trip min/avg/max/stddev = 11.153/14.856/22.400/3.689 ms

The example above shows a ping session to google.com. From the output you can see the IP address being contacted, the sequence number of each packet sent, and the round trip time. 6 packets were sent with an average RTT of 14ms.

One thing to note about the output above and the ping utility in general. Ping is strictly an IPv4 tool. If you’re testing in an IPv6 network you’ll need to use the ping6 utility. The ping6 utility works roughly identical to the ping utility with the exception that it uses IPv6.

Traceroute

Traceroute is a finicky beast. The premise is that you can use this tool to identify the path between a source and destination point. That’s mostly true, with a couple of caveats. Let’s start by explaining how traceroute works.

Traceroute diagram (via StackPath)

Think of traceroute as a string of ping commands. At each step along the path, traceroute identifies the IP of the hop as well as the latency to that hop. But how is it finding each hop? Turns out, it’s using a bit of trickery.

Traceroute uses UDP or ICMP, depending on the OS. On a typical *nix system it uses UDP by default, sending traffic to port 33434 by default. On a Windows system it uses ICMP. As with ping, traceroute can be blocked by not responding to the protocol/port being used.

When you invoke traceroute you identify the destination you’re trying to reach. The command begins by sending a packet to the destination, but it sets the TTL of the packet to 1. This is significant because the TTL value determines how many hops a packet is allowed to pass through before an ICMP Time Exceeded message is returned to the source. The trick here is to start the TTL at 1 and increment it by 1 after the ICMP message is received.

$ traceroute google.com
traceroute to google.com (172.217.10.46), 64 hops max, 52 byte packets
 1  192.168.1.1 (192.168.1.1)  1747.782 ms  1.812 ms  4.232 ms
 2  10.170.2.1 (10.170.2.1)  10.838 ms  12.883 ms  8.510 ms
 3  xx.xx.xx.xx (xx.xx.xx.xx)  10.588 ms  10.141 ms  10.652 ms
 4  xx.xx.xx.xx (xx.xx.xx.xx)  14.965 ms  16.702 ms  18.275 ms
 5  xx.xx.xx.xx (xx.xx.xx.xx)  15.092 ms  16.910 ms  17.127 ms
 6  108.170.248.97 (108.170.248.97)  13.711 ms  14.363 ms  11.698 ms
 7  216.239.62.171 (216.239.62.171)  12.802 ms
    216.239.62.169 (216.239.62.169)  12.647 ms  12.963 ms
 8  lga34s13-in-f14.1e100.net (172.217.10.46)  11.901 ms  13.666 ms  11.813 ms

Traceroute displays the source address of the ICMP message as the name of the hop and moves on to the next hop. When the source address matches the destination address, traceroute has reached the destination and the output represents the route from the source to the destination with the RTT to each hop. As with ping, the RTT values shown are not necessarily representative of the real RTT to a service such as HTTP or SSH. Traceroute, like ping, is considered to be lower priority so RTT values aren’t guaranteed.

There is a second caveat with traceroute you should be aware of. Traceroute shows you the path from the source to the destination. This does not mean that the reverse is true. In fact, there is no current way to identify the path from the destination to the source without running a second traceroute from the destination. Keep this in mind when troubleshooting path issues.

Netstat

Netstat is an indispensable tool that shows you all of the network connections on an endpoint. That is, by invoking netstat on your local machine, all of the open ports and connections are shown. This includes connections that are not completely established as well as connections that are being torn down.

$ sudo netstat -anptu
Active Internet connections (servers and established)
Proto Recv-Q Send-Q Local Address           Foreign Address         State       PID/Program name
tcp        0      0 0.0.0.0:25              0.0.0.0:*               LISTEN      4417/master
tcp        0      0 0.0.0.0:443             0.0.0.0:*               LISTEN      2625/java
tcp        0      0 192.168.1.38:389        0.0.0.0:*               LISTEN      559/slapd
tcp        0      0 0.0.0.0:22              0.0.0.0:*               LISTEN      1180/sshd
tcp        0      0 192.168.1.38:37190      192.168.1.38:389        ESTABLISHED 2625/java
tcp        0      0 192.168.1.38:389        192.168.1.38:45490      ESTABLISHED 559/slapd

The output above shows several different ports in a listening state as well as a few established connections. For listening ports, if the source address is 0.0.0.0, it is listening on all available interfaces. If there is an IP address instead, then the port is open only on that specific interface.

The established connections show the source and destination IPs as well as the source and destination ports. The Recv-Q and Send-Q fields show the number of bytes pending acknowledgement in either direction. Finally, the PID/Program name field shows the process ID and the name of the process responsible for the listening port or connection.

Netstat also has a number of switches that can be used to view other information such as the routing table or interface statistics. Both IPv4 and IPv6 are supported. There are switches to limit to either version, but both are displayed by default.

In recent years, netstat has been superseded by the ss command. You can find more information on the ss command in this post by Ken Hess.

Conclusion

As you can see, these tools are invaluable when troubleshooting network issues. As a network or systems administrator, I highly recommend becoming intimately familiar with these tools. Having these available may save you a lot of time troubleshooting.

How to leverage SNMP and not compromise the security of your server

This post first appeared on Redhat’s Enable Sysadmin community. You can find the post here.

Simple Network Management Protocol, or SNMP, has been around since 1988. While initially intended as an interim protocol as the Internet was first being rolled out, it quickly became a de facto standard for monitoring — and in some cases, managing — network equipment. Today, SNMP is used across most networks, small and large, to monitor the very equipment you likely passed through to get to this blog entry.

There are three primary flavors of SNMP: SNMPv1, SNMPv2c, and SNMPv3. SNMPv1 is, by far, the more popular flavor, despite being considered obsolete due to a complete lack of discernible security. This is likely because of the simplicity of SNMPv1 and that it’s generally used inside of the network and not exposed to the outside world.

The problem, however, is that SNMPv1 and SNMPv2c are unencrypted and even the community string used to “authenticate” is sent in the clear. An attacker can simply listen on the wire and grab the community as it passes by. This gives the attacker access to valuable information on your various devices, and even the ability to make changes if write access is enabled.

But wait, you may be thinking, what about SNMPv3? And you’re right, SNMPv3 *can* be more secure by using authentication and encryption. However, not all devices support SNMPv3 and thus interoperability becomes an issue. At some point, you’ll have to drop down to SNMPv2c or SNMPv1 and you’re back to the “in the clear” issue.

Despite the security shortcoming, SNMP can still be used without compromising the security of your server or network. Much of this security will rely on limiting use of SNMP to read-only and using tools such as iptables to limit where incoming SNMP requests can source from.

To keep things simple, we’ll worry about SNMPv1 and SNMPv2c in this article. SNMPv3 requires some additional setup and, in my opinion, isn’t worth the hassle. So let’s get started with setting up SNMP.

First things first, install the net-snmp package. This can be installed via whatever package manager you use. On the Redhat based systems I use, that tool is yum.

$ yum install net-snmp

Next, we need to configure the snmp daemon, snmpd. The configuration file is located in /etc/snmp/snmpd.conf. Open this file in your favorite editor (vim FTW!) and modify it accordingly. For example, the following configuration enables SNMP, sets up a few specific MIBs, and enables drive monitoring.

################################################################################
# AGENT BEHAVIOUR

agentaddress udp:0.0.0.0:161

################################################################################
# ACCESS CONTROL

# ------------------------------------------------------------------------------
# Traditional Access Control

# ------------------------------------------------------------------------------
# VACM Configuration
#       sec.name       source        community
com2sec notConfigUser default mysecretcommunity


#       groupName      securityModel securityName
group   notConfigGroup v1            notConfigUser
group   notConfigGroup v2c           notConfigUser

#       name          incl/excl  subtree             mask(optional)
view    systemview included .1.3.6.1.2.1.1
view    systemview included .1.3.6.1.2.1.2.2
view    systemview included .1.3.6.1.2.1.25
view    systemview included .1.3.6.1.4.1.2021
view    systemview included .1.3.6.1.4.1.8072.1.3.2.4.1.2

#       group          context sec.model sec.level prefix read       write notif
access  notConfigGroup ""      any       noauth    exact  systemview none  none

# ------------------------------------------------------------------------------
# Typed-View Configuration

################################################################################
# SYSTEM INFORMATION

# ------------------------------------------------------------------------------
# System Group
sysLocation The Internet
sysContact Internet Janitor
sysServices 72
sysName myserver.example.com

################################################################################
# EXTENDING AGENT FUNCTIONALITY


###############################################################################
## Logging
##

## We do not want annoying "Connection from UDP: " messages in syslog.
## If the following option is set to 'no', snmpd will print each incoming
## connection, which can be useful for debugging.

dontLogTCPWrappersConnects no

################################################################################
# OTHER CONFIGURATION

disk /         10%
disk /var      10%
disk /tmp      10%
disk /home     10%

Next, before you start up snmpd, make sure you configure iptables to allow SNMP traffic from trusted sources. SNMP uses UDP port 161, so all you need is a simple rule to allow traffic to pass. Be sure to add an outbound rule as well; UDP traffic is stateless.

iptables -A INPUT -s <ip addr> -p udp -m udp --dport 161 -j ACCEPT

iptables -A OUTPUT -p udp -m udp --sport 161 -j ACCEPT

You can set this up in firewalld as well, just search for SNMP and firewalld on Google.

Now that SNMP is set up, you can point an SNMP client at your server and pull data. You can pull data via the name of the MIB (if you have the MIB definitions installed) or via the OID.

$ snmpget -c mysecretcommunity myserver.example.com hrSystemUptime.0
HOST-RESOURCES-MIB::hrSystemUptime.0 = Timeticks: (6638000) 18:26:20.00

$ snmpget -c mysecretcommunity myserver.example.com .1.3.6.1.2.1.25.1.1.0
HOST-RESOURCES-MIB::hrSystemUptime.0 = Timeticks: (6638000) 18:26:20.00

And that’s about it. It’s called SIMPLE Network Management Protocol for a reason, after all.

One additional side note about SNMP. While SNMP is pretty solid, the security shortcomings are significant. I recommend looking at other solutions such as agent-based systems versus using SNMP. Tools like Nagios and Prometheus have more secure mechanisms for monitoring systems.

It’s docker, it’s a container, it’s… a process?

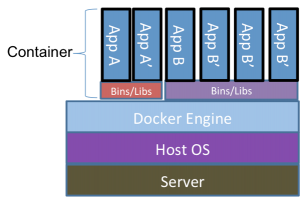
In a previous post I discussed Docker from a high level. In this post, we’ll take a closer look at how processes run in a container and how it differs from the common view of the architecture that is used to explain Docker. Remember this?

Docker Layers

The problem with this image, however, is that while it helps conceptualize what we’re talking about, it doesn’t reflect reality. If you listed the processes outside of the container, one might think you’d see the docker daemon running and a bunch of additional processes that represent the containers themselves:

[root@dockerhost ~]# ps -ef
UID        PID  PPID  C STIME TTY          TIME CMD
root         1     0  0 Oct15 ?        00:02:40 /usr/lib/systemd/systemd --switched-root --system --deserialize 21
root         2     0  0 Oct15 ?        00:00:03 [kthreadd]
root         3     2  0 Oct15 ?        00:03:44 [ksoftirqd/0]
...
root      4000     1  0 Oct15 ?        00:03:44 dockerd
root      4353  4000  0 Oct15 ?        00:03:44 myawesomecontainer1
root      4354  4000  0 Oct15 ?        00:03:44 myawesomecontainer2
root      4355  4000  0 Oct15 ?        00:03:44 myawesomecontainer3

And while this might be what you’d expect based on the image above, it does not represent reality. What you’ll actually see is the docker daemon running with a number of additional helper daemons to handle things like networking, and the processes that are running “inside” of the containers like this:

[root@dockerhost ~]# ps -ef
UID        PID  PPID  C STIME TTY          TIME CMD
root         1     0  0 Oct15 ?        00:02:40 /usr/lib/systemd/systemd --switched-root --system --deserialize 21
root         2     0  0 Oct15 ?        00:00:03 [kthreadd]
root         3     2  0 Oct15 ?        00:03:44 [ksoftirqd/0]
...
root      1514     1  0 Oct15 ?        04:28:40 /usr/bin/dockerd-current --add-runtime docker-runc=/usr/libexec/docker/docker-runc-current --default-runtime=docker-runc --exec-opt nat
root      1673  1514  0 Oct15 ?        01:27:08 /usr/bin/docker-containerd-current -l unix:///var/run/docker/libcontainerd/docker-containerd.sock --metrics-interval=0 --start-timeout
root      4035  1673  0 Oct31 ?        00:00:07 /usr/bin/docker-containerd-shim-current d548c5b83fa61d8e3bd86ad42a7ffea9b7c86e3f9d8095c1577d3e1270bb9420 /var/run/docker/libcontainerd/
root      4054  4035  0 Oct31 ?        00:01:24 apache2 -DFOREGROUND
33        6281  4054  0 Nov13 ?        00:00:07 apache2 -DFOREGROUND
33        8526  4054  0 Nov16 ?        00:00:03 apache2 -DFOREGROUND
33       24333  4054  0 04:13 ?        00:00:00 apache2 -DFOREGROUND
root     28489  1514  0 Oct31 ?        00:00:01 /usr/libexec/docker/docker-proxy-current -proto tcp -host-ip 0.0.0.0 -host-port 443 -container-ip 172.22.0.3 -container-port 443
root     28502  1514  0 Oct31 ?        00:00:01 /usr/libexec/docker/docker-proxy-current -proto tcp -host-ip 0.0.0.0 -host-port 80 -container-ip 172.22.0.3 -container-port 80
33       19216  4054  0 Nov13 ?        00:00:08 apache2 -DFOREGROUND

Without diving too deep into this, the docker processes you see above serve a few processes. There’s the main dockerd process which is responsible for management of docker containers on this host. The containerd processes handle all of the lower level management tasks for the containers themselves. And finally, the docker-proxy processes are responsible for the networking layer between the docker daemon and the host.

You’ll also see a number of apache2 processes mixed in here as well. Those are the processes running within the container, and they look just like regular processes running on a linux system. The key difference is that a number of kernel features are being used to isolate these processes so they are isolated away from the rest of the system. On the docker host you can see them, but when viewing the world from the context of a container, you cannot.

What is this black magic, you ask? Well, it’s primarily two kernel features called Namespaces and cgroups. Let’s take a look at how these work.

Namespaces are essentially internal mapping mechanisms that allow processes to have their own collections of partitioned resources. So, for instance, a process can have a pid namespace allowing that process to start a number of additional processed that can only see each other and not anything outside of the main process that owns the pid namespace. So let’s take a look at our earlier process list example. Inside of a given container you may see this:

[root@dockercontainer ~]# ps -ef
UID        PID  PPID  C STIME TTY          TIME CMD
root         1     0  0 Nov27 ?        00:00:12 apache2 -DFOREGROUND
www-data    18     1  0 Nov27 ?        00:00:56 apache2 -DFOREGROUND
www-data    20     1  0 Nov27 ?        00:00:24 apache2 -DFOREGROUND
www-data    21     1  0 Nov27 ?        00:00:22 apache2 -DFOREGROUND
root       559     0  0 14:30 ?        00:00:00 ps -ef

While outside of the container, you’ll see this:

[root@dockerhost ~]# ps -ef
UID        PID  PPID  C STIME TTY          TIME CMD
root         1     0  0 Oct15 ?        00:02:40 /usr/lib/systemd/systemd --switched-root --system --deserialize 21
root         2     0  0 Oct15 ?        00:00:03 [kthreadd]
root         3     2  0 Oct15 ?        00:03:44 [ksoftirqd/0]
...
root      1514     1  0 Oct15 ?        04:28:40 /usr/bin/dockerd-current --add-runtime docker-runc=/usr/libexec/docker/docker-runc-current --default-runtime=docker-runc --exec-opt nat
root      1673  1514  0 Oct15 ?        01:27:08 /usr/bin/docker-containerd-current -l unix:///var/run/docker/libcontainerd/docker-containerd.sock --metrics-interval=0 --start-timeout
root      4035  1673  0 Oct31 ?        00:00:07 /usr/bin/docker-containerd-shim-current d548c5b83fa61d8e3bd86ad42a7ffea9b7c86e3f9d8095c1577d3e1270bb9420 /var/run/docker/libcontainerd/
root      4054  4035  0 Oct31 ?        00:01:24 apache2 -DFOREGROUND
33        6281  4054  0 Nov13 ?        00:00:07 apache2 -DFOREGROUND
33        8526  4054  0 Nov16 ?        00:00:03 apache2 -DFOREGROUND
33       24333  4054  0 04:13 ?        00:00:00 apache2 -DFOREGROUND
root     28489  1514  0 Oct31 ?        00:00:01 /usr/libexec/docker/docker-proxy-current -proto tcp -host-ip 0.0.0.0 -host-port 443 -container-ip 172.22.0.3 -container-port 443
root     28502  1514  0 Oct31 ?        00:00:01 /usr/libexec/docker/docker-proxy-current -proto tcp -host-ip 0.0.0.0 -host-port 80 -container-ip 172.22.0.3 -container-port 8033       19216  4054  0 Nov13 ?        00:00:08 apache2 -DFOREGROUND

There are two things to note here. First, within the container, you’re only seeing the processes that the container runs. No systems, no docker daemons, etc. Only the apache2 and ps processes. From outside of the container, however, you see all of the processes running on the system, including those within the container. And, the PIDs listed inside if the container are different from those outside of the container. In this example, PID 4054 outside of the container would appear to map to PID 1 inside of the container. This provides a layer of security such that running a process inside of a container can only interact with other processes running in the container. And if you kill process 1 inside of a container, the entire container comes to a screeching halt, much as if you kill process 1 on a linux host.

PID namespaces are only one of the namespaces that Docker makes use of. There are also NET, IPC, MNT, UTS, and User namespaces, though User namespaces are disabled by default. Briefly, these namespaces provide the following:

  • NET
    • Isolates a network stack for use within the container. Network stacks can, and typically are, shared between containers.
  • IPC
    • Provides isolated Inter-Process Communications within a container, allowing a container to use features such as shared memory while keeping the communication isolated within the container.
  • MNT
    • Allows mount points to be isolated, preventing new mount points from being added to the host system.
  • UTS
    • Allows different host and domains names to be presented to containers
  • User
    • Allows a mapping of users and groups with container to the host system, thereby preventing a root user within a container from running as pid 1 outside of the container.

The second piece of black magic used is Control Groups or cgroups. Cgroups isolates resource usage for a process. Where Namespaces creates a localized view of resources for a process, cgroups creates a limited pool of resources for a process. For instance, you can assign specific CPU, Memory, and Disk I/O limits to a container. With a cgroup is assigned, the process cannot exceed the limits put on it, thereby preventing processes from “running away” and exhausting system resources. Instead, the process either deals with the lower resource limits, or crashes.

By themselves, these features can be a bit daunting to set up for each process or group of processes. Docker conveniently packages this up, making deployment as simple as a docker run command. Combined with the packaging of a Docker container (which I’ll cover in a future post), Docker becomes a great way to deploy software in a reproducible, secure manner.

Multiple Personalities With The Linux Kernel

Virtualization is all the rage these days. Taking a single computer system and installing multiple “guest” operating systems on it. The benefits are a reduced footprint and better utilization of existing resources. There is a danger, however, in having many systems dependent on a single piece of hardware. The solution, of course, is to use multiple pieces of hardware and allow your “guests” to be moved between the individual hardware units, thus making the system more resilient to failure.

I’ve started playing a bit with virtualization, specifically, KVM virtualization. For my purposes, I’m using CentOS 6.x on a 64-bit capable system.

The hypervisor itself is a standard CentOS base install with the addition of kvm and various management packages. I installed the hypervisor on a RAID1 LVM, allowing me some room to grow if necessary, and reserving the remainder of the hard drive for virtual hosts. While you can use binary blobs for virtual disk, I prefer using a raided LVM which gives me the ability to grow the disk if necessary as well as minor bumps in speed.

Using yum, adding KVM to an existing installation is a pretty straightforward process :

yum install virt-manager libvirt libvirt-python python-virtinst

That should take care of any dependencies required to get KVM virtualization up and running.

Next up, we need to tackle networking. There are many, many different configurations, far too many to go through here. So, I’m going to keep it simple. For my purposes, I need a single connection to the outside network, all in the same VLAN, as well as a local NAT for some VMs that I need local access to, but that don’t need to be accessed via the Internet.

Setting this up is brilliantly simple. First, copy the /etc/sysconfig/network-scripts/ifcfg-eth0 file to /etc/sysconfig/network-scripts/ifcfg-br0. Next, edit the ifcfg-eth0 file. You’ll need to remove a bunch of lines and add a BRIDGE line as follows :

DEVICE=”eth0″

BRIDGE=”br0″

HWADDR=”00:11:22:33:44:55″

ONBOOT=”yes”

Next, edit the ifcfg-br0 file. All you really need to do here is change the DEVICE= line to reflect br0. I also recommend disabling NM_CONTROLLED … NetworkManager shouldn’t be installed anyway since you used a base install, but better safe than sorry. In the end, the ifcfg-br0 file should look something like this :

DEVICE=”br0″

BOOTPROTO=”static”

BROADCAST=”204.10.167.63″

IPADDR=”204.10.167.50″

NETMASK=”255.255.255.192″

ONBOOT=”yes”

TYPE=”Bridge”

DELAY=”0″

Restart networking and you’ll be all set. The NAT portion of this is handled by KVM itself, so there’s nothing to do there. And networking should be all ready to go.

Without guests, however, all you have is a basic Linux system with a few extra packages taking up space. The real magic starts when you create and install your first VM. My recommendation is to start with creating a template system you can clone later rather than hand-installing every single VM. To install the template, first decide on the base disk size. I’m using 15 GB volumes which is more than enough for the base install and leaves room for most basic server configurations. If you need more space, you can attach additional disks later.

I’m not going to go into how I set up LVM, there are plenty of tutorials out there. For the purposes of this article, I have a volume group names vg_libvirt where I plan to store all of the virtual machines. So first we create the disk necessary for the template :

lvcreate -L15G -n template_base vg_libvirt

Next we install the OS. virt-install is essentially a wrapper script that sets all the necessary values within KVM to get you going. After the settings are configured and the VM is started, girt-installer will automatically attach you to the VM console. The full command I used to install is as follows :

virt-install –accelerate –hvm –connect qemu:///system –network bridge:bra –name template –ram 512 –disk=/dev/mapper/vg_libvirt-template_base –vcpus=1 –check-cpu –nographics –extra-args=”console=ttyS0 text” –location=/tmp/CentOS-6.2-x86_64-bin-DVD1.iso

Since this is effectively a text install, you do run into a bit of a problem. Namely, you can’t configure the drives the way you want. There is a way around this, though it takes a bit of work. Of course, since you’re creating a template, the little bit of work now is easily made up for later. So, here’s how I handled the drive configuration.

First, run through a basic install using the above install method. Once you’re up and running, log into the new VM and head to the root home directory. In that directory you’ll find a kickstart file called anaconda-ks.cfg. Make a local copy of that file and shut down the VM.

The kickstart file gives you the basic parameters that CentOS used to configure the system. You can edit this file and use it yourself to automatically install and configure systems. For our purposes, we’re interested in editing the drive configuration and then using the kickstart file to create the template. So, edit the file and set the parameters as you see fit. An example is as follows :

# Kickstart file automatically generated by anaconda.

#version=DEVEL

install

cdrom

lang en_US.UTF-8

keyboard us

network –onboot no –device eth0 –noipv4 –noipv6

rootpw –iscrypted somerandomstringthatiwontrevealtoyoubutnicetry

firewall –service=ssh

authconfig –enableshadow –passalgo=sha512

selinux –enforcing

timezone –utc America/New_York

bootloader –location=mbr –driveorder=vda –append=” console=ttyS0 crashkernel=auto”

# The following is the partition information you requested

# Note that any partitions you deleted are not expressed

# here so unless you clear all partitions first, this is

# not guaranteed to work

clearpart –all –drives=vda

part /boot –fstype=ext4 –size=500

part swap –size=2048

part pv.253002 –grow –size=1

volgroup VolGroup –pesize=4096 pv.253002

logvol / –fstype=ext4 –name=lv_root –vgname=VolGroup –size=4096

logvol /tmp –fstype=ext4 –name=lv_tmp –vgname=VolGroup –size=2048

logvol /var –fstype=ext4 –name=lv_var –vgname=VolGroup –size=4096

logvol /home –fstype=ext4 –name=lv_home –vgname=VolGroup –size=2048

#repo –name=”CentOS” –baseurl=cdrom:sr0 –cost=100

%packages –nobase

@core

%end

Once you have this, you can re-run the girt-install command from above with a slight tweak to make the install use the kickstart file you created (I named it kick1.ks) :

virt-install –accelerate –hvm –connect qemu:///system –network bridge:bra –name template –ram 512 –disk=/dev/mapper/vg_libvirt-template_base –vcpus=1 –check-cpu –nographics –initrd-inject=/path/to/kick1.ks –extra-args=”ks=file:/kick1.ks console=ttyS0 text” –location=/tmp/CentOS-6.2-x86_64-bin-DVD1.iso

This will nuke the existing VM and replace it with one configured with the drive partitions as set in the kickstart file. And now you almost have a template.

You could use this new VM as a clone, but if you’ve set an IP on it, you’ll run into duplicate IP problems. SSH keys on the machine will be cloned, making all of your systems contain the same keys. And other machine-specific settings will be cloned as well. This can be worked around, though.

I recommend that you first configure this new template with the basic settings you want on all of your VMs. For instance, if you’re using Spacewalk for server management, you can install all of the necessary spacewalk binaries. You can configure a standard iptables template for the system. Maybe you have some standard security software you use such as OSSEC. And, of course, create the standard users on the system so you don’t have to create them each time you clone the VM. Once everything is installed and running how you want it, perform the following actions to make the template :

touch /.unconfigured

rm -rf /etc/ssh/ssh_host_*

poweroff

The VM will power down and you’ll have your template. Cloning this to a new VM is quick and simple. First, create the new logical volume as we did before. Next, clone the VM to the new drive :

virt-clone -o template -n new_vm -f /dev/mapper/vg_libvirt-new_vm_base

Simple enough, right? Run this command and when it completed, you can start the VM and connect to the console. You’ll be greeted with the standard first boot process and then dropped at a login prompt. Congratulations, you now have a VM. Set the IP, configure whatever services you need, and you’re off to the races.

If you need to modify the RAM, number of CPUs, etc., then use the virsh command on the hypervisor. You’ll need to shut down the VM and restart it in order for these changes to take effect.

And that’s really all there is to it. The VMs themselves can be treated as self-contained systems with no special care necessary … One note, however. If you reboot the hypervisor, the VMs are paused before rebooting and resumed after reboot. This leads to an interesting problem in that the uptime on a VM can easily exceed that of the hypervisor. Be aware of this and don’t depend on a VMs uptime to be accurate.

Hey KVM, you’ve got your bridge in my netfilter…

It’s always interesting to see how new technologies alter the way we do things.  Recently, I worked on firewalling for a KVM-based virtualization platform.  From the outset it seems pretty straightforward.  Set up iptables on the host and guest and move on.  But it’s not that simple, and my google-fu initially failed me when searching for an answer.

The primary issue was that when iptables was enabled on the host, the guests became unavailable.  If you enable logging, you can see the traffic being blocked by the host, thus never making it to the guest.  So how do we do this?  Well, if we start with a generic iptables setup, we have something that looks like this:

# Firewall configuration written by system-config-securitylevel
# Manual customization of this file is not recommended.
*filter
:INPUT ACCEPT [0:0]
:FORWARD ACCEPT [0:0]
:OUTPUT ACCEPT [0:0]
:RH-Firewall-1-INPUT – [0:0]
-A INPUT -j RH-Firewall-1-INPUT
-A FORWARD -j RH-Firewall-1-INPUT
-A RH-Firewall-1-INPUT -i lo -j ACCEPT
-A RH-Firewall-1-INPUT -p icmp –icmp-type any -j ACCEPT
-A RH-Firewall-1-INPUT -m state –state ESTABLISHED,RELATED -j ACCEPT
-A RH-Firewall-1-INPUT -m state –state NEW -m tcp -p tcp –dport 22 -j ACCEPT
-A RH-Firewall-1-INPUT -j REJECT –reject-with icmp-host-prohibited
COMMIT

Adding logging to identify what’s going on is pretty straightforward.  Add two logging lines, one for the INPUT chain and one for the FORWARD chain.  Make sure these are added as the first rules in the chain, otherwise you’ll jump to the RH-Firewall-1-INPUT chain and never make it to the log.

-A INPUT -j LOG –log-prefix “Firewall INPUT: ”
-A FORWARD -j LOG –log-prefix “Firewall FORWARD: ”


Now, with this in place you can try sending traffic to the domU.  If you tail /var/log/messages, you’ll see the blocking done by netfilter.  It should look something like this:

Apr 18 12:00:00 example kernel: Firewall FORWARD: IN=br123 OUT=br123 PHYSIN=vnet0 PHYSOUT=eth1.123 SRC=192.168.1.2 DST=192.168.1.1 LEN=56 TOS=0x00 PREC=0x00 TTL=64 ID=18137 DF PROTO=UDP SPT=56712 DPT=53 LEN=36

There are a few things of note here.  First, this occurs on the FORWARD chain only.  The INPUT chain is bypassed completely.  Second, the system recognizes that this is a bridged connection.  This makes things a bit easier to fix.

My attempt at resolving this was to put in a rule that allowed traffic to pass for the bridged interface.  I added the following:

-A FORWARD -i br123 -o br123 -j ACCEPT

This worked as expected and allowed the traffic through the FORWARD chain, making it to the domU unmolested.  However, this method means I have to add a rule for every bridge interface I create.  While explicitly adding rules for each interface should make this more secure, it means I may need to change iptables while the system is in production and running, not something I want to do.

A bit more googling led me to this post about KVM and iptables.  In short it provides two additional methods for handling this situation.  The first is a more generalized rule for bridged interfaces:

-A FORWARD -m physdev –physdev-is-bridged -j ACCEPT

Essentially, this rule tells netfilter to accept any traffic for bridged interfaces.  This removes the need to add a new rule for each bridged interface you create making management a bit simpler.  The second method is to completely remove bridged interfaces from netfilter.  Set the following sysctl variables:

net.bridge.bridge-nf-call-ip6tables = 0
net.bridge.bridge-nf-call-iptables = 0
net.bridge.bridge-nf-call-arptables = 0

I’m a little worried about this method as it completely bypasses iptables on dom0.  However, it appears that this is actually a more secure manner of handling bridged interfaces.  According to this bugzilla report and this post, allowing bridged traffic to pass through netfilter on dom0 can result in a possible security vulnerability.  I believe this is somewhat similar to cryptographic hash collision.  Attackers can take advantage of netfilter entries with similar IP/port combinations and possibly modify traffic or access systems.  By using the sysctl method above, the traffic completely bypasses netfilter on dom0 and these attacks are no longer possible.

More testing is required, but I believe the latter method of using sysctl is the way to go.  In addition to the security considerations, bypassing netfilter has a positive impact on throughput.  It seems like a win-win from all angles.

Centralized Firewall Logging

I currently maintain a number of Linux-based servers. The number of servers is growing, and management becomes a bit wieldy after a while. One move I’ve made is to start using Spacewalk for general package and configuration management. This has turned out to be a huge benefit and I highly recommend it for anyone in the same position as I am. Sure, Spacewalk has its bugs, but it’s getting better with every release. Kudos to Redhat for bringing such a great platform to the public.

Another area of problematic management is the firewall. I firmly believe in defense in depth and I have several layers of protection on these various servers. One of those layers is the iptables configuration on the server itself. Technically, iptables is the program used to configure the filtering ruleset for a Linux kernel with the ip_tables packet filter installed. For the purposes of this article, iptables encompasses both the filter itself as well as the tools used to configure it.

Managing the ruleset on a bunch of disparate servers can be a daunting task. There are often a set of “standard” rules you want to deploy across all of the servers, as well as specialized rules based on what role the server plays. The standard rules are typically for management subnets, common services, and special filtering rules to drop malformed packets, source routes, and more. There didn’t seem to be an easy way to deploy such a ruleset, so I ended up rolling my own script to handle the configuration. I’ll leave that for a future blog entry, though.

In addition to centralized configuration, I wanted a way to monitor the firewall from a central location. There are several reasons for this. One of the major reasons is convenience. Having to wade through tons of logwatch reports, or manually access each server to check the local firewall rules is difficult and quickly reaches a point of unmanageability. What I needed was a way to centrally monitor the logs, adding and removing filters as necessary. Unfortunately, there doesn’t seem to be much out there. I stumbled across the iptablelog project, but it appears to be abandoned.

Good did come of this project, however, as it lead me to look into ulogd. The ulog daemon is a userspace logger for iptables. The iptables firewall can be configured to send security violations, accounting, and flow information to the ULOG target. Data sent to the ULOG target is picked up by ulogd and sent wherever ulogd is configured to send it. Typically, this is a text file or a sql database.

Getting started with ulogd was a bit of a problem for me, though. To start, since I’m using a centralized management system, I need to ensure that any new software I install uses the proper package format. So, my first step was to find an RPM version of ulogd. I can roll my own, of course, but why re-invent the wheel? Fortunately, Fedora has shipped with ulogd since about FC6. Unfortunately for me, however, I was unable to get the SRPM for the version that ships with Fedora 11 to install. I keep getting a cpio error. No problem, though, I just backed up a bit and downloaded a previous release. It appears that nothing much has changed as ulogd 1.24 has been released for some time.

Recompiling the ulog SRPM for my CentOS 5.3 system failed, however, complaining about linker problems. Additionally, there were errors when the configure script was run. So before I could get ulogd installed and running, I had to get it to compile. It took me a while to figure it out as I’m not a linker expert, but I came up with the following patch, which I added to the RPM spec file.

— ./configure 2006-01-25 06:15:22.000000000 -0500
+++ ./configure 2009-09-10 22:37:24.000000000 -0400
@@ -1728,11 +1728,11 @@
EOF

MYSQLINCLUDES=`$d/mysql_config –include`
– MYSQLLIBS=`$d/mysql_config –libs`
+ MYSQLLIBS=`$d/mysql_config –libs | sed s/-rdynamic//`

DATABASE_DIR=”${DATABASE_DIR} mysql”

– MYSQL_LIB=”${DATABASE_LIB} ${MYSQLLIBS} ”
+ MYSQL_LIB=”${DATABASE_LIB} -L/usr/lib ${MYSQLLIBS}”
# no change to DATABASE_LIB_DIR, since –libs already includes -L

DATABASE_DRIVERS=”${DATABASE_DRIVERS} ../mysql/mysql_driver.o ”
@@ -1747,7 +1747,8 @@
echo $ac_n “checking for mysql_real_escape_string support””… $ac_c” 1>&6
echo “configure:1749: checking for mysql_real_escape_string support” >&5

– MYSQL_FUNCTION_TEST=`strings ${MYSQLLIBS}/libmysqlclient.so | grep mysql_real_escape_string`
+ LIBMYSQLCLIENT=`locate libmysqlclient.so | grep libmysqlclient.so$`
+ MYSQL_FUNCTION_TEST=`strings $LIBMYSQLCLIENT | grep mysql_real_escape_string`

if test “x$MYSQL_FUNCTION_TEST” = x
then

In short, this snippet modifies the linker flags to add /usr/lib as a directory and removed the -rdynamic flag which mysql_config seems to errantly present. Additionally, it modifies how the script identifies whether the mysql_real_escape_string function is present in the version of MySQL installed. Both of these changes resolved my compile problem.

After getting the software to compile, I was able to install it and get it running. Happily enough, the SRPM I started with included patches to add an init script as well as a logrotate script. This makes life a bit easier when getting things running. So now I had a running userspace logger as well as a standardized firewall. Some simple changes to the firewall script added ULOG support. You can download the SRPM here.

At this point I have data being sent to both the local logs as well as a central MySQL database. Unfortunately, I don’t have any decent tools for manipulating the data in the database. I’m using iptablelog as a starting point and I’ll expand from there. To make matters more difficult, ulogd version 2 seems to make extensive changes to the database structure, which I’ll need to keep in mind when building my tools.

I will, however, be releasing them to the public when I have something worth looking at. Having iptablelog as a starting point should make things easier, but it’s still going to take some time. And, of course, time is something I have precious little of to begin with. Hopefully, though, I’ll have something worth releasing before the end of this year. Here’s hoping!


The Case of the Missing RAID

I have a few servers with hardware RAID directly on the motherboard. They’re not the best boards in the world, but they process my data and serve up the information I want. Recently, I noticed that one of the servers was running on the /dev/sdb* devices, which was extremely odd. Digging some more, it seemed that /dev/sda* existed and seemed to be ok, but wasn’t being used.

After some searching, I was able to determine that the server, when built, actually booted up on /dev/mapper/via_* devices, which were actually the hardware RAID. At some point these devices disappeared. To make matters worse, it seems that kernel updates weren’t being applied correctly. My guess is that either the grub update was failing, or it updated a boot loader somewhere that wasn’t actually being used to boot. As a result, an older kernel was loading, with no way to get to the newer kernel.

I spent some time tonight digging around with Google, posting messages on the CentOS forums, and digging around on the system itself. With guidance from a user via the forums, I discovered that my system should be using dmraid, which is a program that discovers and runs RAID devices such as the one I have. Digging around a bit more with dmraid and I found this :

[user@dev ~]$ sudo /sbin/dmraid -ay -v
Password:
INFO: via: version 2; format handler specified for version 0+1 only
RAID set “via_bfjibfadia” was not activated
[user@dev ~]$

Apparently my RAID is running version 2 and dmraid only supports versions 0 and 1. Since this was initially working, I’m at a loss as to why my RAID is suddenly not supported. I suppose I can rebuild the machine, again, and check, but the machine is about 60+ miles from me and I’d rather not have to migrate data anyway.

So how does one go about fixing such a problem? Is my RAID truly not supported? Why did it work when I built the system? What changed? If you know what I’m doing wrong, I’d love to hear from you… This one has me stumped. But fear not, when I have an answer, I’ll post a full writeup!


Introducing, The Touchbook

Engadget posted a story about a new Netbook from a company called Always Innovating. A press release about the product can be found here. In short, it’s a netbook, and a tablet PC, but without the typical “fold it over on top of the keyboard” scenario. The screen literally detaches from the keyboard and becomes an autonomous unit.

Inside this little beast is an ARM OMAP3 processor with 8 Gig of storage on a micro SD chip. They don’t specify which OMAP3 processor is included, so both speed and die size is unknown. It touts an 8.9″ screen, typical of the current netbook generation. For network access it has 802.11b/g/n Wifi. Bluetooth is also included, so the possibility of tethering exists as well.
Both the tablet and keyboard have built-in batteries. Battery life is expected to be 10 to 15 hours when both the tablet and keyboard are used in-concert. The tablet is expected to last between 3 and 5 hours on battery when it is disconnected from the keyboard. Battery life in the keyboard is, of course, irrelevant.

Always Innovating demonstrated the Touchbook at DEMO 2009, a technical conference that wrapped up yesterday. The demonstration video is included below:

Overall, this looks to be a fairly decent device. I’m a bit concerned about the ARM processor, and I wonder what sort of OS support it will have. The TouchBook OS will be installed by default, though from reading the FAQs, it appears that it will run anything from Android, to Ubuntu, to Windows CE.

I’m also curious as to what the device will be using for memory. Is memory shared on the SD card? Or will there be actual RAM in the device? All questions I hope to have answers for in the near future. Looks good, though, and I’m excited at the prospect of possibly getting one. Definitely something I could put to good use!


Headless Linux Testing Clients

As part of my day to day job, I’ve been working on a headless Linux client that can be transported from site to site to automate some network testing.  I can’t really go into detail on what’s being tested, or why, but I did want to write up a (hopefully) useful entry about headless client and some of the changes I made to the basic CentOS install to get everything to work.

First up was the issue of headless operation.  We’re using Cappuccino SlimPRO SP-625 units with the triple Gigabit Ethernet option.  They’re not bad little machines, though I do have a gripe with the back cover on them.  It doesn’t properly cover all of the ports on the back, leaving rather large holes where dust and dirt can get in.  What’s worse is that the power plug is not surrounded and held in place by the case, so I can foresee the board cracking at some point from the stress of the power cord…  But, for a sub-$800 machine, it’s not all that bad.

Anyway, on to the fun.  These machines will be transported to various locations where testing is to be performed.  On-site, there will be no keyboard, no mouse, and no monitor for them.  However, sometimes things go wrong and subtle adjustments may need to be made.  This means we need a way to get into the machine, locally, just in case there’s a problem with the network connection.  Luckily, there’s a pretty simple means of accessing a headless Linux machine without the need to lug around an extra monitor, keyboard, and mouse.  If you’ve ever worked on a switch or router, you’ll know where I’m going with this.

Most technician have access to a laptop, especially if they have to configure routers or switches.  Why not access a Linux box the same way?  Using the agetty command, you can.  A getty is a program that manages terminals within Unix.  Those terminals can be physical, like the local keyboard, or virtual, like a telnet or ssh session.  The agetty program is an alternative getty program that has some non-standard features such as baud rate detection, adaptive tty, and more.  In short, it’s perfect for direct serial, or even dial-in connections.

Setting this all up is a snap, too.  By default, CentOS (and most Linux distros) set up six gettys for virtual terminals.  These virtual terminals use yet another getty, mingetty, which is a minimalized getty program with only enough features for virtual terminals.  In order to provide serial access, we need to add a few lines to enable agettys on the serial ports.

But wait, what serial ports do we have?  Well, assuming they are enabled in the BIOS, we can see them using the dmesg and setserial commands.  The dmesg command prints out the current kernel message buffer to the screen.  This is usually the output from the boot sequence, but if your system has been up a while, it may contain more recent messages.  We can use dmesg to determine the serial interfaces like this :

[friz@test ~]$ dmesg | grep serial
serial8250: ttyS0 at I/O 0x3f8 (irq = 4) is a 16550A
serial8250: ttyS1 at I/O 0x2f8 (irq = 3) is a 16550A

As you can see from the output above, we have both a ttyS0 and a ttyS1 port available on this particular machine.  Now, we use setserial to make sure the system recognizes the ports:

[friz@test ~]$ sudo setserial -g /dev/ttyS[0-1]
/dev/ttyS0, UART: 16550A, Port: 0x03f8, IRQ: 4
/dev/ttyS1, UART: 16550A, Port: 0x02f8, IRQ: 3

The output is similar to dmesg, but setserial actually polls the port to get the necessary information, thereby ensuring that it’s active.  Also note, you will likely need to run this command as root to make it work.

Now that we know what serial ports we have, we just need to add them to the inittab and reload the init daemon.  Adding these to the inittab is pretty simple.  Your inittab will look something like this:

#
# inittab       This file describes how the INIT process should set up
#               the system in a certain run-level.
#
# Author:       Miquel van Smoorenburg, <miquels@drinkel.nl.mugnet.org>
#               Modified for RHS Linux by Marc Ewing and Donnie Barnes
#

# Default runlevel. The runlevels used by RHS are:
#   0 – halt (Do NOT set initdefault to this)
#   1 – Single user mode
#   2 – Multiuser, without NFS (The same as 3, if you do not have networking)
#   3 – Full multiuser mode
#   4 – unused
#   5 – X11
#   6 – reboot (Do NOT set initdefault to this)
#
id:3:initdefault:

# System initialization.
si::sysinit:/etc/rc.d/rc.sysinit

l0:0:wait:/etc/rc.d/rc 0
l1:1:wait:/etc/rc.d/rc 1
l2:2:wait:/etc/rc.d/rc 2
l3:3:wait:/etc/rc.d/rc 3
l4:4:wait:/etc/rc.d/rc 4
l5:5:wait:/etc/rc.d/rc 5
l6:6:wait:/etc/rc.d/rc 6

# Trap CTRL-ALT-DELETE
ca::ctrlaltdel:/sbin/shutdown -t3 -r now

# When our UPS tells us power has failed, assume we have a few minutes
# of power left.  Schedule a shutdown for 2 minutes from now.
# This does, of course, assume you have powerd installed and your
# UPS connected and working correctly.
pf::powerfail:/sbin/shutdown -f -h +2 “Power Failure; System Shutting Down”

# If power was restored before the shutdown kicked in, cancel it.
pr:12345:powerokwait:/sbin/shutdown -c “Power Restored; Shutdown Cancelled”

# Run gettys in standard runlevels
1:2345:respawn:/sbin/mingetty tty1
2:2345:respawn:/sbin/mingetty tty2
3:2345:respawn:/sbin/mingetty tty3
4:2345:respawn:/sbin/mingetty tty4
5:2345:respawn:/sbin/mingetty tty5
6:2345:respawn:/sbin/mingetty tty6

# Run xdm in runlevel 5
x:5:respawn:/etc/X11/prefdm -nodaemon

Just add the following after the original gettys lines:

# Run agettys in standard runlevels
s0:2345:respawn:/sbin/agetty -L -f /etc/issue.serial 9600 ttyS0 vt100
s1:2345:respawn:/sbin/agetty -L -f /etc/issue.serial 9600 ttyS1 vt100

Let me explain quickly what the above means.  Each line is broken into multiple fields, separated by a colon.  At the very beginning of the line is an identifier, s0 and s1 in our case.  Next comes a list of the runlevels for which this program should be spawned.  Finally, the command to run is last.

The agetty command takes a number of arguments:

    • The -L switch disables carrier detect for the getty.
    • The next switch, -f, tells agetty to display the contents of a file before the login prompt, /etc/issue.serial in our case.
    • Next is the baud rate to use.  9600 bps is a good default value to use.  You can specify speeds up to 152,200 bps, but they may not work with all terminal programs.
    • Next up is the serial port, ttyS0 and ttyS1 in our example.
    • Finally, the terminal emulation to use.  VT100 is probably the most common, but you can use others.

Now that you’ve added the necessary lines, reload the init daemon via this command:

[friz@test ~]$ sudo /sbin/init q

At this point, you should be able to connect a serial cable to your Linux machine and access it via a program such as minicom, PuTTY, or hyperterminal.  And that’s all there is to it.

You can also redirect the kernel to output all console messages to the serial port as well.  This is accomplished by adding a switch to the kernel line in your /etc/grub.conf file like this:

# grub.conf generated by anaconda
#
# Note that you do not have to rerun grub after making changes to this file
# NOTICE:  You have a /boot partition.  This means that
#          all kernel and initrd paths are relative to /boot/, eg.
#          root (hd0,0)
#          kernel /vmlinuz-version ro root=/dev/hdc3
#          initrd /initrd-version.img
#boot=/dev/hdc
default=0
timeout=5
splashimage=(hd0,0)/grub/splash.xpm.gz
hiddenmenu
title CentOS (2.6.18-53.1.21.el5)
root (hd0,0)
kernel /vmlinuz-2.6.18-53.1.21.el5 ro root=LABEL=/ console=ttyS0,9600
initrd /initrd-2.6.18-53.1.21.el5.img

The necessary change is highlighted above.  The console switch tells the kernel that you want to re-direct the console output.  The first option is the serial port to re-direct to, and the second is the baud rate to use.

And now you have a headless Linux system!  These come in handy when you need a Linux machine for remote access, but you don’t want to deal with having a mouse, keyboard, and monitor handy to access the machine locally.