Prometheus

We will entangle buds and flowers and beams

Which twinkle on the fountain’s brim, and make

Strange combinations out of common things

“Prometheus Unbound” by Percy Bysshe Shelley

This post first appeared on Redhat’s Enable Sysadmin community. You can find the post here.

Welcome to the world of metrics collection and performance monitoring. As with most things IT, entire market sectors have been built to sell these tools. And, of course, there are a number of open source tools that serve the same purpose. It’s one of these open source tools that we’re going to take a look at.

What is Prometheus?

Prometheus is a metrics collection and alerting tool developed and released to open source by SoundCloud. Prometheus is similar in design to Google’s Borgmon monitoring system and a relatively modest system can handle collecting hundreds of thousands of metrics every second. Properly tuned and deployed, a Prometheus cluster can collect millions of metrics every second.

Prometheus is made up of roughly four parts:

  • The main Prometheus app itself that is responsible for scraping metrics, storing them in the database, and (optionally) retrieving them when queried.
    • The database backend is an internal Time Series database. This database is always used, but data can also be sent to remote storage backends.
  • Exporters are optional external programs that ingest data from a variety of sources and convert it to metrics that Prometheus can scrape.
    • Exporters are purpose built applications for working with specific applications and hardware.
  • AlertManager is an alert management system. It ships with Prometheus.
  • Client Libraries that can be used to instrument custom applications.

I say “roughly” four parts because there are plenty of additional applications that are often used with a standard Prometheus cluster. If you need or want better graphing capabilities, applications like Grafana can be deployed. If you need to store metrics for long periods of time, remote storage backends are worth looking into. And the list goes on. For the purposes of this article, however, we’re going to focus on Prometheus itself with a small detour into exporters.

What is a metric?

But before we get there, we need to understand why something like Prometheus exists. So let’s start with a question. What are metrics? Simply put, metrics measure something. For instance, the time it takes you to read this article is a metric. The number or words is a metric. The average number of letters in the words of this article is a metric.

But those metrics are fairly static and not something you’d necessarily need a system like Prometheus for. Prometheus excels at metrics that change over time. For instance, what if you wanted to know how many “views” this article is getting? Or what if you wanted to know how much traffic was entering and leaving your network? Or how many build and deploy cycles are happening each hour? All of these are metrics that can be fed into Prometheus.

Now that we understand what a metric is, let’s take a look at how Prometheus gets the metrics it needs to store. The first thing Prometheus needs is a target. Targets are the endpoints that supply the metrics that Prometheus stores. These endpoints can be the actual endpoint being monitored or they can be a piece of middleware known as an exporter. Endpoints can be supplied via a static configuration or they can be “found” through a process called service discovery. Service Discovery is a more advanced topic and will be covered in a future article.

Once Prometheus has a list of endpoints, it can begin to retrieve metrics from them. Prometheus retrieves metrics in a very straightforward manner, a simple HTTP request. The configuration points at a specific location on the endpoint that will supply a stream of text identifying the metric and its current value. Prometheus reads this stream of text, ignoring lines beginning with a # as comments, and stores the metrics it receives in a local database.
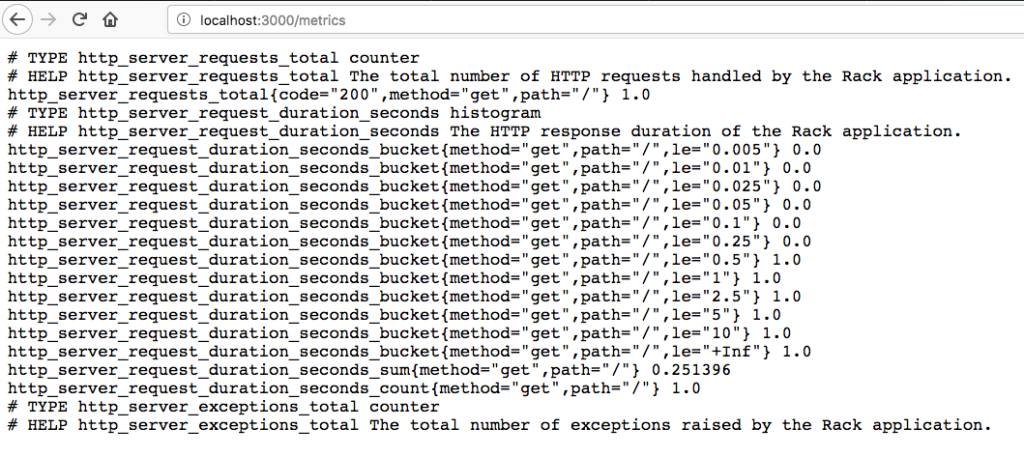
Figure 1 – Example metrics output (from itNext)

A short sidetrack into Exporters

Prometheus can only talk HTTP to endpoints for metrics collection. So what happens when you’re trying to monitor a router or switch that only communicates using SNMP? Or perhaps you want to monitor a cloud service that doesn’t have a native Prometheus metrics endpoint? Fortunately, there’s a solution. Exporters.

Exporters come in many shapes and sizes. These are small, purpose-built programs designed to stand between Prometheus and anything you want to monitor that doesn’t natively support Prometheus. Some exporters sit idle until Prometheus polls them for data. When this happens, the exporter reaches out to the device it’s monitoring, gets the relevant data, and converts it to a format that Prometheus can ingest. Other exporters poll devices automatically, caching the results locally for Prometheus to pick up later.

Regardless of design, exporters act as a translator between Prometheus and endpoints you want to monitor. Chances are, if you’re trying to monitor a common device or application, there’s an exporter out there for it.

Data Storage

Prometheus uses a special type of database on the back end known as a time series database. Simply put, this database is optimized to store and retrieve data organized as values over a period of time. Metrics are an excellent example of the type of data you’d store in such a database.

External storage is also an option. There are many options such as Thanos, Cortex, and VictoriaMetrics that provide a variety of benefits. One of the primary benefits is to centralize the gathered metrics and allow for long term storage. Tools such as Grafana can query these third party storage solutions directly.

So you have a bunch of metrics…

Now that you’re an expert on Prometheus and you have it storing metrics, how do you use this data? Much like a SQL database, Prometheus has a custom query language known as PromQL. PromQL is pretty straightforward for simple metrics but has a lot of complexity when needed. Simply supplying the name of a metric will show all “instances” of that metric:
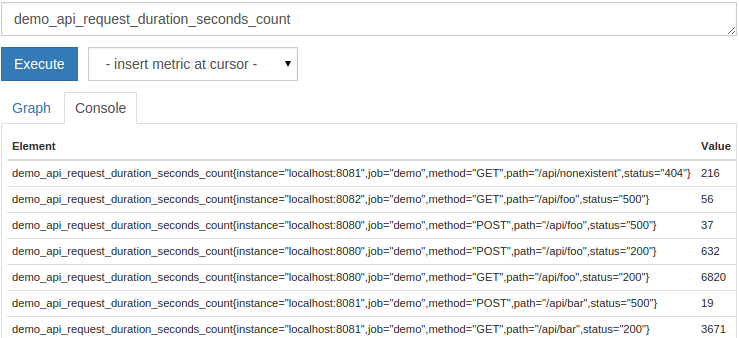
Figure 2 – Simple PromQL query (from Digital Ocean)

Or you can use some PromQL methods and generate a graph representing the data you’re after.
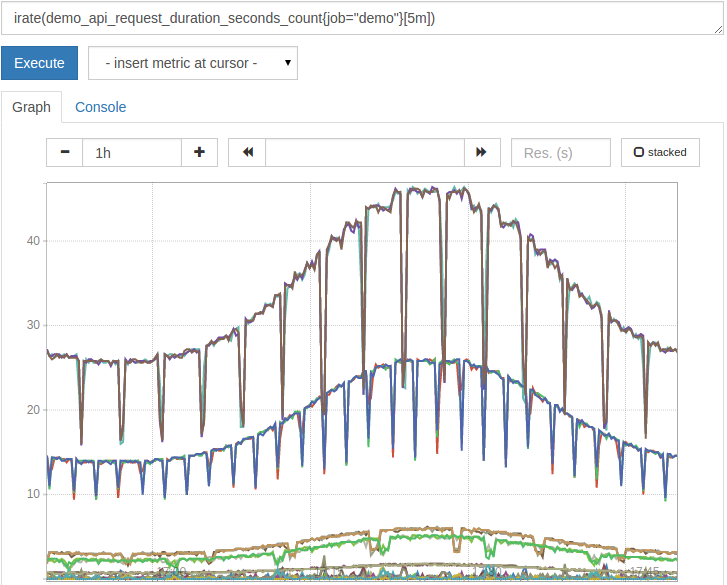
Figure 3 – Graphing example (from Digital Ocean)

Of course, if you’re serious about graphing, it’s worth looking into a package such as Grafana. Grafana allows you to create dashboards of metrics, send alerts, and more.

Alerting

While graphs are pretty to look at, metrics can serve another, important, purpose. They can be used to send alerts. Prometheus includes a separate application, called AlertManager, that serves this purpose. AlertManager receives notifications from Prometheus and handles all of the necessary logic to dedupe and deliver the alerts.

Alerts are created by writing alert rules. These rules are simply PromQL queries that fire when the query is true. That is, if you have a query that checks if the temperature on the cpu is over 80C then the query fires for each metric that meets that condition.

Alert rules can also include a time period over which a rule must evaluate to true. Expanding on our temperature example, exceeding 80C is ok if it’s a brief period of time. But if it lasts more than 5 minutes, send an alert. Alerts can be sent via email, slack, twitter, sms, and pretty much anything else you can write an interface for.

Figure 4 – Alerting rules (from Rancher)

Wrap Up

Monitoring is important. It helps identify when things have gone wrong and it can show when things are going right. Proper monitoring can be used across a variety of disciplines to squeeze everything you can out of the object being monitored.

Prometheus is a powerful open-source metrics package. It is highly scalable, robust, and extremely fast. A single modern server can be used to monitor a million metrics or more per second. Distributing Prometheus servers allows for many tens and even hundreds of millions of metrics to be monitored every second.

PromQL provides a robust querying language that can be used for graphing as well as alerting. The built-in graphing system is great for quick visualizations but longer term dashboarding should be handled in external applications such as Grafana.

Really Awesome New Cisco confIg Differ

Configuration management is pretty important, but often overlooked. It’s typically easy enough to handle configurations for servers since you have access to standard scripting tools as well as cron. Hardware devices such as switches and routers are a bit more to handle, though, as automating backups of these configs can be daunting, at best.

Several years ago, I took the time to write a fairly comprehensive configuration backup system for the company I was working for. It handled Cisco routers and switches, Fore Systems/Marconi ASX ATM switches, Redback SMS aggregators, and a few other odds and ends. Unfortunately, it was written specifically for that company and not something easily converted for general use.

Fortunately, there’s a robust open source alternative called RANCID. The Really Awesome New Cisco confIg Differ, RANCID, is a set of perl scripts designed to automate configuration retrieval from a host of devices including Cisco, Juniper, Redback, ADC, HP, and more. Additionally, since most of the framework is already there, you can extend it as needed to support additional devices.

RANCID has a few interesting features which make life much easier as a network admin. First, when it retrieves the configuration from a device, it checks it in to either a CVS or SVN repository. This gives you the ability to see changes between revisions, as well as the ability to retrieve an old revision of a config from just about any point in time. Additionally, RANCID emails a list of the changes between the current and last revision of a configuration to you. This way you can keep an eye on your equipment, seeing alerts when things change. Very, very useful to detect errors by you and others.

Note: RANCID handles text-based configurations. Binary configurations are a whole different story. While binary configs can be placed in an SVN repository, getting emailed about changes becomes a problem. It’s possible to handle binary configs, though I do not believe RANCID has this capability.

Setup of RANCID is pretty straightforward. You can either install straight from source, or use a pre-packaged RPM. For this short tutorial, I’ll be using an RPM-based installation. The source RPM I’m using can be found here. It is assumed that you can either rebuild the RPM via the rpmbuild utility, or you can install the software from source.

After the software is installed, there are a few steps required to set up the software. First, I would recommend editing the rancid.conf file. I find making the following modifications to be a good first step:

RCSSYS=svn; export RCSSYS
* Change RCSSYS from cvs to svn. I find SVN to be a superior revisioning system. Your mileage may vary, but I’m going to assume you’re using SVN for this tutorial.

FILTER_PWDS=ALL; export FILTER_PWDS
NOCOMMSTR=YES; export NOCOMMSTR
* Uncommenting these and turning them on ensures that passwords are not stored on your server. This is a security consideration as these files are stored in cleartext format.

OLDTIME=4; export OLDTIME
* This setting tells RANCID how long a device can be unreachable before alerting you to the problem. The default is 24 hours. Depending on how often you run RANCID, you may want to change this option.

LIST_OF_GROUPS=”routers switches firewalls”
* This is a list of names you’ll use to identify devices. These names are arbitrary, so Fred Bob and George are ok. However, I would encourage you to use something meaningful.

The next step is to create the CVS/SVN repositories you’ll be using. This can’t possibly be easier. Switch to the rancid user, then run rancid-cvs. You’ll see output similar to the following:

-bash-3.2$ rancid-cvs
Committed revision 1.
Checked out revision 1.
A configs
Adding configs
Committed revision 2.
A router.db
Adding router.db
Transmitting file data .
Committed revision 3.
Committed revision 4.
Checked out revision 4.
A configs
Adding configs
Committed revision 5.
A router.db
Adding router.db
Transmitting file data .
Committed revision 6.
-bash-3.2$

That’s it, your repositories are created. All that’s left is to set up the user credentials that rancid will use to access the devices, tell rancid which devices to contact, and finally, where to send email. Again, this is quite straightforward.

User credentials are stores in the .cloginrc file located in the rancid home directory. This file is quite detailed with explanations of the various configuration options. In short, for most Cisco devices, you’ll want something like this:

add user * <username>
add password * <login password> <enable password>
add method * ssh

This tells the system to use the given username and passwords for accessing all devices in rancid via ssh. You can specify overrides by adding additional lines above these, replacing the * with the device name.

Next, tell rancid what devices to contact. As the rancid user, switch to the appropriate repository directory. For instance, if we’re adding a router, switch to ~rancid/routers and edit the router.db file. Note: This file is always called router.db, regardless of the repository you are in. Each line of this file consists of three fields, separated by colons. Field 1 is the hostname of the device, field 2 is the type of device, and field 3 is either up or down depending on whether the device is up or not. If you remove a device from this file, the configuration is removed from the repository, so be careful.

router.example.com:cisco:up

Finally, set up the mailer addresses for receiving rancid mail. These consist of aliases on the local machine. If you’re using sendmail, edit the /etc/aliases file and add the following :

rancid-<group>: <email target>
rancid-admin-<group>: <email target>

There are two different aliases needed for each group. Groups are the names used for the repositories. So, in our previous example, we have three groups, switches, routers, and firewalls. So we set up two aliases for each, sending the results to the appropriate parties. The standard rancid-<group> alias is used for sending config diffs. The rancid-admin-<group> alias is used to send alerts about program problems such as not being able to contact a device.

Make sure you run newaliases when you’re done editing the aliases file.

Once these are all set up, we can run a test of rancid. As the rancid user, run rancid-run. This will run through all of the devices you have identified and begin retrieving configurations. Assuming all went well, you should receive notifications via email about the new configurations identified.

If you have successfully run rancid and retrieved configurations, it’s time to set up the cron job to have this run automagically. Merely edit the crontab file for rancid and add something similar to the following:

# run config differ 11 minutes after midnight, 2am, 4am, etc.
11 0-23/2 * * * /usr/bin/rancid-run
# clean out config differ logs
50 23 * * * /usr/bin/find /var/rancid/logs -type f -mtime +2 -exec rm {} \;

Offsetting the times a bit is a good practice, just to ensure everything doesn’t run at once and bog down the system. The second entry cleans up the rancid log files, removing anything older than 2 days.

And that’s it! You’re well on your way to being a better admin. Now to finish those other million or so “great ideas” ….


Network Graphing

Visual representations of data can provide additional insight into the inner workings of your network. Merely knowing that one of your main feeds is peaking at 80% utilization isn’t very helpful when you don’t know how long the peak is, at what time, and when it started.

There are a number of graphing solutions available. Some of these are extremely simplistic and don’t do much, while others are overly powerful and provide almost too much. I prefer using Cacti for my graphing needs.

Cacti is a web-based graphing solution built on top of RRDtool. RRDtool is a round-robin data logging and graphing tool developed by Tobias Oetiker of MRTG fame, MRTG being one of the original graphing systems.

Chock full of features, Cacti allows data collection from almost anywhere. It supports SNMP and script-based collection by default, but additional methods can easily be added. Graphs are fully configurable and can display just about any information you want. You can combine multiple sources on a single graph, or create multiple graphs for better resolution. Devices, once added, can be arranged into a variety of hierarchies allowing multiple views for various users. Security features allow the administrator to tailor the data shown to each user.

Cacti is a wonderful tool to have and is invaluable when it comes to tracking down problems with the network. The ability to graph anything that spits out data makes it incredibly useful. For instance, you can create graphs to show you the temperature of equipment, utilization of CPUs, even the number of emails being sent per minute! The possibilities are seemingly endless.

There is a slight learning curve, however. Initial setup is pretty simple, and adding devices is straightforward. The tough part is understanding how Cacti gathers data and relates it all together. There are some really good tutorials on their documentation site that can help you through this part.

Overall, I think Cacti is one of the best graphing tools out there. The graphs come out very professional looking, and the feature set is amazing. Definitely worth looking into.

Host Intrusion Detection

Monitoring your network includes trying to keep the bad guys out. Unfortunately, unless you disconnect your computer and keep it in a locked vault, there’s no real way to ensure that your system is 100% hack proof. So, in addition to securing your network, you need to monitor for intrusions as well. It’s better to be able to catch an intruder early rather than find out after they’ve done a huge amount of damage.

Intrusion detection systems (IDS) are designed to detect possible intrusion attempts. There are a number of different IDS types, but this post concentrates on the Host Intrusion Detection System (HIDS).

My preferred HIDS of choice is Osiris. Osiris uses a client/server architecture, making it one of the more unique HIDS out there. The server stores all of the configurations and databases, and triggers the scanning process. SSL is used between the client and server to ensure communication integrity.

Once a new client is added, the server performs an initial scan. A configuration file is pushed to the client which then scans the computer accordingly, reporting the results back to the server. This first scan is then used as a baseline database for future comparisons.

The host periodically polls the clients and requests scans. The results of those scans are compared to the baseline database and an alert is sent if there are differences. An administrator can then determine if the changes were authorized and take appropriate action. If the changes are ok, Osiris is updated to use the new results as the baseline database. If the changes are suspect, the administrator can look further into them.

Osiris is very configurable. Scanning intervals can be set, allowing you fine-grained control over the time between scans. Multiple administrators can be set up to monitor and accept changes. Emails can be sent for each and every scan, regardless of changes.

The configuration file allows you to pick and choose what files on the client system are to be monitored. Fine-grain control over this allows the administrator to specify whole directories, or individual files. A filtering system can prevent erroneous results to be sent. For instance, some backup systems change the ctime to reflect when the file was last backed up. Without a filter, Osiris would report changes to all of the files each time a backup is run. Setting up a simple filter to ignore ctime on a file allows the administrator to ignore the backup process.

Overall, Osiris is a great tool for monitoring your server. Be prepared, though, monitoring HIDS can get cumbersome, especially with a large number of servers. Every update, change, or new program installed can trigger a HIDS alert.

There are other HIDS packages as well. I have not tested most of these, but they are included for completeness :

  • OSSEC
  • OSSEC is an actively maintained HIDS that supports log analysis, integrity checking, rootkit detection, and more.
  • AFICK
  • AFICK is another actively maintained HIDS that offers both CLI and GUI based operation
  • Samhain
  • Samhain is one of the more popular HIDS that offers a centralized monitoring system similar to that of Osiris.
  • Tripwire
  • Tripwire is a commercial HIDS that allows monitoring of configurations, files, databases and more. Tripwire is quite sophisticated and is mostly intended for large enterprises.
  • Aide
  • Aide is an open-source HIDS that models itself after Tripwire

Network Monitoring

I’ve been working a lot with network monitoring lately.  While mostly dealing with utilization monitoring, I do dabble with general network health systems as well.

There are several ways to monitor a network and determine the “health” of a given element.  The simple, classic example is the ICMP echo request.  Simply ping the device and if it responds, it’s alive and well.

This doesn’t always work out, however.  Take, for instance, a server.  Pinging the server simply indicates that the TCP/IP stack on the server is functioning properly.  But what about the processes running on the server?  How do you make sure those are running properly?

Other “health” related items are utilization, system integrity, and environment.  When designing and/or implementing a network health system, you need to take all of these items into account.


I have used several different tools to monitor the health of the networks I’ve dealt with.  These tools range from custom written tools to off-the-shelf products.  Perhaps at some point in the future I can release the custom tools, but for now I’ll focus on the freely available tools.


For general network monitoring I use a tool called Argus.  Argus is a pretty robust monitoring system written in Perl.  It’s pretty simple to set up and the config file is pretty self explanatory.  Monitoring capabilities include ping (using fping), SNMP, http, and DNS.  You can monitor specific ports on a device, allowing you to determine the health of a particular service.

Argus also has some unique capabilities that I haven’t seen in many other monitoring systems.  For instance, you can monitor a web page and detect when specific strings within that webpage change.  This is perfect for monitoring software revisions and being alerted to new releases.  Other options include monitoring of databases via the Perl DBI module.

The program can alert you in a number of different manners such as email or paging (using qpage).  Additional notification methods are certainly possible with custom code.

The program provides a web interface similar to that older versions of What’s Up Gold.  There is a fairly robust access control system that allows the administrator to lock users into specific sections of the interface with custom lists of available elements.

Elements can be configured with dependencies, allowing alerts to be suppressed for child elements.  Each element can also be independently configured with a variety of options to allow or suppress alerts, modify monitoring cycle times, send custom alert messages, and more.  Check out the documentation for more information.  There’s also an active mailing list to help you out if you have additional questions.


In future posts I’ll touch on some of the other tools I have in my personal toolkit such as host intrusion detection systems, graphing systems, and more.  Stay tuned!