Proxy by Traefik

For the past 30 or so years, if you wanted to proxy traffic to your web server, there were two, sometimes three, primary applications you reached for. Apache httpd, nginx, and HAProxy.

Apache httpd is one of the first web servers created, and is currently one of the most popular in use. While primarily used to serve web traffic, httpd can also be used to proxy traffic with the mod_proxy module. In addition to acting as a simple proxy, mod_proxy can also cache traffic, allowing for significant latency reduction for clients.

HAProxy is another option for proxying traffic. HAProxy tends to be deployed in load balancing scenarios and not single-server proxy situations. It is used by a number of high profile websites due to its speed and efficiency.

Finally, nginx is the third proxying solution. In addition to proxying, nginx can also serve many of the same roles as Apache httpd including local balancing, caching, and traditional web serving. Like haproxy, nginx is known for more efficient memory usage as compared to Apache httpd.

These solutions are battle hardened and have worked well for many years. But as technology changes, it often requires changes in the tools we use. With the advent of containerization, the tools we use should be re-examined and we should determine if we still have the best tools for the job.

Both nginx and haproxy were the primary choices used for proxying with containers. As the technology matured, however, new tools were created to take advantage of new features. One of those tools is Traefik.

Traefik is, according to their marketing, a “cloud native edge router.” If we tear apart the marketing speak, it’s basically a proxy built with containers in mind. It’s written in Go, and it has quite a few tricks up its sleeve.

You can use Traefik in the same general context as any of the other proxies, deploying it on a normal server and using a static configuration. Even deployed like this, the configuration is quite straightforward and very flexible.

But the real power of Traefik comes when it’s deployed in a container environment. Instead of using a static configuration, Traefik can listen to the docker daemon for specific labels applied to containers. Those labels contain the Traefik configuration for the container they’re applied to. It works similar to the static configuration, but it’s dynamic in nature, configuring Traefik as containers are started and stopped.

The community version of Traefik allows this by directly mounting the docker socket file, which is a bit of a security risk. If this container were to be compromised, an attacker could use the mounted socket to control other containers on the server. So this isn’t a secure way of deploying Traefik.

There are other ways to deploy, however, that make the system inherently more secure. Traefik has released an enterprise version, TraefikEE, that decouples the configuration management piece into its own container. This container also mounts the docker socket file, but has no external ports open, thereby isolating the container. The purpose of this new management container is to read changes in the labels and push the configuration to the primary Traefik container. It also scales, allowing additional Traefik nodes to be added which will receive the configuration from the management container.

Another way to deploy this securely is to use an external storage container for the traefik configuration. Consul is a popular option for this. Consul, amongst other things, is a key-value store. The configuration for Traefik can be stored here and dynamically updated as needed. Traefik will automatically re-read the configuration and adjust accordingly.

There are caveats with this method, however. First, you’ll need a way to get the configuration for the containers into Consul. Fortunately, there’s an open source project that may be able to do this already called registrator.

The registrator project works similar to how the management container works for TraefikEE, though in a more general way. It’s not specifically for Traefik, but intended to register containers with Consul. It’s an isolated container that listens for labels and adds the data to Consul. There are no open ports, reducing the likelihood that this particular container can be compromised and used to attack the rest of the system.

I haven’t tested using registrator in this way, however. (It doesn’t work, see the UPDATE below) I believe it would require modifying the registrator configuration to both register the containers as well as add arbitrary configuration information to Consul. This is something I’ll be investigating later as I learn more about how Consul works.

Another caveat to this approach is that there is no atomic update mechanism in Consul. What this means is that if Consul reads the configuration while it’s being updated by something like registrator, it’s will end up using an incomplete configuration until the next time it reads the configuration. There is a workaround for this in the documentation, but it requires additional programming to put into place.

Despite these few drawbacks, however, Traefik is an amazing tool for proxying in a container environment. And the Containous team is hard at work on version 2 which significantly cleans up and enhances the configuration possible with Traefik as well as adding the ability to add middleware functions that can be used to dynamically alter traffic as it passes through Traefik. Definitely worth checking out when it’s released.

UPDATE: I finally had a chance to do some research on registering services with Consul and inserting data in the to he KV store. Unfortunately, registrator can’t do this job. It only handles creating tags on a Consul entry and not KV entries.

I have been unsuccessful, thus far, in finding a solution for this particular use case. However, I believe that the registrator source code can be updated to allow for this.
It’s docker, it’s a container, it’s… a process?

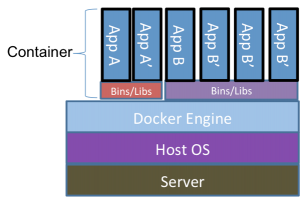
In a previous post I discussed Docker from a high level. In this post, we’ll take a closer look at how processes run in a container and how it differs from the common view of the architecture that is used to explain Docker. Remember this?

Docker Layers

The problem with this image, however, is that while it helps conceptualize what we’re talking about, it doesn’t reflect reality. If you listed the processes outside of the container, one might think you’d see the docker daemon running and a bunch of additional processes that represent the containers themselves:

[root@dockerhost ~]# ps -ef
UID        PID  PPID  C STIME TTY          TIME CMD
root         1     0  0 Oct15 ?        00:02:40 /usr/lib/systemd/systemd --switched-root --system --deserialize 21
root         2     0  0 Oct15 ?        00:00:03 [kthreadd]
root         3     2  0 Oct15 ?        00:03:44 [ksoftirqd/0]
...
root      4000     1  0 Oct15 ?        00:03:44 dockerd
root      4353  4000  0 Oct15 ?        00:03:44 myawesomecontainer1
root      4354  4000  0 Oct15 ?        00:03:44 myawesomecontainer2
root      4355  4000  0 Oct15 ?        00:03:44 myawesomecontainer3

And while this might be what you’d expect based on the image above, it does not represent reality. What you’ll actually see is the docker daemon running with a number of additional helper daemons to handle things like networking, and the processes that are running “inside” of the containers like this:

[root@dockerhost ~]# ps -ef
UID        PID  PPID  C STIME TTY          TIME CMD
root         1     0  0 Oct15 ?        00:02:40 /usr/lib/systemd/systemd --switched-root --system --deserialize 21
root         2     0  0 Oct15 ?        00:00:03 [kthreadd]
root         3     2  0 Oct15 ?        00:03:44 [ksoftirqd/0]
...
root      1514     1  0 Oct15 ?        04:28:40 /usr/bin/dockerd-current --add-runtime docker-runc=/usr/libexec/docker/docker-runc-current --default-runtime=docker-runc --exec-opt nat
root      1673  1514  0 Oct15 ?        01:27:08 /usr/bin/docker-containerd-current -l unix:///var/run/docker/libcontainerd/docker-containerd.sock --metrics-interval=0 --start-timeout
root      4035  1673  0 Oct31 ?        00:00:07 /usr/bin/docker-containerd-shim-current d548c5b83fa61d8e3bd86ad42a7ffea9b7c86e3f9d8095c1577d3e1270bb9420 /var/run/docker/libcontainerd/
root      4054  4035  0 Oct31 ?        00:01:24 apache2 -DFOREGROUND
33        6281  4054  0 Nov13 ?        00:00:07 apache2 -DFOREGROUND
33        8526  4054  0 Nov16 ?        00:00:03 apache2 -DFOREGROUND
33       24333  4054  0 04:13 ?        00:00:00 apache2 -DFOREGROUND
root     28489  1514  0 Oct31 ?        00:00:01 /usr/libexec/docker/docker-proxy-current -proto tcp -host-ip 0.0.0.0 -host-port 443 -container-ip 172.22.0.3 -container-port 443
root     28502  1514  0 Oct31 ?        00:00:01 /usr/libexec/docker/docker-proxy-current -proto tcp -host-ip 0.0.0.0 -host-port 80 -container-ip 172.22.0.3 -container-port 80
33       19216  4054  0 Nov13 ?        00:00:08 apache2 -DFOREGROUND

Without diving too deep into this, the docker processes you see above serve a few processes. There’s the main dockerd process which is responsible for management of docker containers on this host. The containerd processes handle all of the lower level management tasks for the containers themselves. And finally, the docker-proxy processes are responsible for the networking layer between the docker daemon and the host.

You’ll also see a number of apache2 processes mixed in here as well. Those are the processes running within the container, and they look just like regular processes running on a linux system. The key difference is that a number of kernel features are being used to isolate these processes so they are isolated away from the rest of the system. On the docker host you can see them, but when viewing the world from the context of a container, you cannot.

What is this black magic, you ask? Well, it’s primarily two kernel features called Namespaces and cgroups. Let’s take a look at how these work.

Namespaces are essentially internal mapping mechanisms that allow processes to have their own collections of partitioned resources. So, for instance, a process can have a pid namespace allowing that process to start a number of additional processed that can only see each other and not anything outside of the main process that owns the pid namespace. So let’s take a look at our earlier process list example. Inside of a given container you may see this:

[root@dockercontainer ~]# ps -ef
UID        PID  PPID  C STIME TTY          TIME CMD
root         1     0  0 Nov27 ?        00:00:12 apache2 -DFOREGROUND
www-data    18     1  0 Nov27 ?        00:00:56 apache2 -DFOREGROUND
www-data    20     1  0 Nov27 ?        00:00:24 apache2 -DFOREGROUND
www-data    21     1  0 Nov27 ?        00:00:22 apache2 -DFOREGROUND
root       559     0  0 14:30 ?        00:00:00 ps -ef

While outside of the container, you’ll see this:

[root@dockerhost ~]# ps -ef
UID        PID  PPID  C STIME TTY          TIME CMD
root         1     0  0 Oct15 ?        00:02:40 /usr/lib/systemd/systemd --switched-root --system --deserialize 21
root         2     0  0 Oct15 ?        00:00:03 [kthreadd]
root         3     2  0 Oct15 ?        00:03:44 [ksoftirqd/0]
...
root      1514     1  0 Oct15 ?        04:28:40 /usr/bin/dockerd-current --add-runtime docker-runc=/usr/libexec/docker/docker-runc-current --default-runtime=docker-runc --exec-opt nat
root      1673  1514  0 Oct15 ?        01:27:08 /usr/bin/docker-containerd-current -l unix:///var/run/docker/libcontainerd/docker-containerd.sock --metrics-interval=0 --start-timeout
root      4035  1673  0 Oct31 ?        00:00:07 /usr/bin/docker-containerd-shim-current d548c5b83fa61d8e3bd86ad42a7ffea9b7c86e3f9d8095c1577d3e1270bb9420 /var/run/docker/libcontainerd/
root      4054  4035  0 Oct31 ?        00:01:24 apache2 -DFOREGROUND
33        6281  4054  0 Nov13 ?        00:00:07 apache2 -DFOREGROUND
33        8526  4054  0 Nov16 ?        00:00:03 apache2 -DFOREGROUND
33       24333  4054  0 04:13 ?        00:00:00 apache2 -DFOREGROUND
root     28489  1514  0 Oct31 ?        00:00:01 /usr/libexec/docker/docker-proxy-current -proto tcp -host-ip 0.0.0.0 -host-port 443 -container-ip 172.22.0.3 -container-port 443
root     28502  1514  0 Oct31 ?        00:00:01 /usr/libexec/docker/docker-proxy-current -proto tcp -host-ip 0.0.0.0 -host-port 80 -container-ip 172.22.0.3 -container-port 8033       19216  4054  0 Nov13 ?        00:00:08 apache2 -DFOREGROUND

There are two things to note here. First, within the container, you’re only seeing the processes that the container runs. No systems, no docker daemons, etc. Only the apache2 and ps processes. From outside of the container, however, you see all of the processes running on the system, including those within the container. And, the PIDs listed inside if the container are different from those outside of the container. In this example, PID 4054 outside of the container would appear to map to PID 1 inside of the container. This provides a layer of security such that running a process inside of a container can only interact with other processes running in the container. And if you kill process 1 inside of a container, the entire container comes to a screeching halt, much as if you kill process 1 on a linux host.

PID namespaces are only one of the namespaces that Docker makes use of. There are also NET, IPC, MNT, UTS, and User namespaces, though User namespaces are disabled by default. Briefly, these namespaces provide the following:

  • NET
    • Isolates a network stack for use within the container. Network stacks can, and typically are, shared between containers.
  • IPC
    • Provides isolated Inter-Process Communications within a container, allowing a container to use features such as shared memory while keeping the communication isolated within the container.
  • MNT
    • Allows mount points to be isolated, preventing new mount points from being added to the host system.
  • UTS
    • Allows different host and domains names to be presented to containers
  • User
    • Allows a mapping of users and groups with container to the host system, thereby preventing a root user within a container from running as pid 1 outside of the container.

The second piece of black magic used is Control Groups or cgroups. Cgroups isolates resource usage for a process. Where Namespaces creates a localized view of resources for a process, cgroups creates a limited pool of resources for a process. For instance, you can assign specific CPU, Memory, and Disk I/O limits to a container. With a cgroup is assigned, the process cannot exceed the limits put on it, thereby preventing processes from “running away” and exhausting system resources. Instead, the process either deals with the lower resource limits, or crashes.

By themselves, these features can be a bit daunting to set up for each process or group of processes. Docker conveniently packages this up, making deployment as simple as a docker run command. Combined with the packaging of a Docker container (which I’ll cover in a future post), Docker becomes a great way to deploy software in a reproducible, secure manner.

The obligatory Docker 101 post

Welcome to the obligatory Docker 101 post. Before I dive into more technical posts on this subject, I thought it would be worth the time to explain what docker is and what I find exciting about it. If you’re familiar with Docker already, there likely won’t be anything new here for you, but I welcome any feedback you have.

So, what is Docker? Docker is a containerization technology first release as open source in 2013. But what is containerization? Containerization, or Operating System Level Virtualization, refers to the isolation, using kernel-level features, of a set of processes in which the processes only see a localized view of the system. This differs from Platform Virtualization in that Containerization is not presenting a set of virtual resources to the isolated processes, but is presenting real resources limited only by the configuration of that particular container.

One of the more common explanations of this architecture is shown in the following image:

Docker Layers

This image is a bit problematic in that it doesn’t truly represent what you actually see on a docker host, but we’ll save that for a later blog post. For now, trust that the above is a very simplified view of the docker world.

So why containerization and why Docker in particular? There are a number of benefits that containerization technology provides. Among these are immutability, portability, and security. Let’s touch briefly on each of these.

Immutability refers to the concept of something being unchangeable. In the case of containerization, a container is considered to be immutable. That is, once created, the container itself will remain unchanged for the duration of its life. But, it’s important to understand what this means in practice. The container image itself is immutable, but once running, the contents of the container can be changed within the parameters of its execution. The immutable piece of this comes into play when you destroy a running container and recreate it from the container image. That recreated image will have the exact same characteristics as the original container, assuming the same configuration is used to start the container. A notable exception to this is external volumes. Any volume external to the container is not guaranteed to be immutable as it’s not part of the original container image.

Portability refers to the ability to move containers between disparate systems and the container will run exactly the same, assuming no external dependencies. There are limitations to this such as requiring the same cpu architecture across the systems, but overall, a container can be moved from system to system and be expected to behave the same. In fact, this is part of the basis of orchestration and scalability of containers. In the event of a failure, or if additional instances of a container are necessary, they can be spun up on additional systems. And provided any external dependencies are available to all of the systems that the container is spun up on, the containers will run and behave the same.

Containers provide an additional layer of security over traditional virtual or physical hosts. Because the processes are isolated within the container, an attacker is left with a very limited attack surface. In the event of a compromise, the attacker only gets a foothold on that instance of the container and is generally left with very little tooling inside of the container with which to pivot to additional resources. If an attacker is able to make changes to the running container, the admin can simply destroy the container and spin up a new one which will no longer have the compromised changes. Obviously the admin needs to identify how the attacker got in and patch the container, but this ability to destroy and recreate a container is a powerful way to stop attackers from pivoting through your systems.

Finally, the internal networking of the docker system allows containers to run with no externally accessible ports. So, for instance, if you’re running some sort of dynamic site that requires a proxy, application, and database, the system can be set up such that the proxy is the only externally accessible container. All communication between the proxy, application, and database can be performed over the internal docker networking which has no externally accessible endpoint.

There’s a lot to be excited about here. Done correctly, the days of endlessly troubleshooting issues caused by server cruft are over. Deployment of resources because incredibly straightforward and rapid. Rollbacks become vastly simplified as you can just spin up the old version of the container. Containers provide developers a means to run their code locally, exactly as it will be run in production!

I’ve been working with containers for about 3 years now and the landscape just keeps expanding. There’s so much to learn and so many new tools to play with.

Finally, I’m going to leave you with a talk by Alice Goldfuss. Alice is an engineer that currently works for Github. She has a ton of container experience and a lot to say about it. Definitely worth a watch.